Crochet "Rainbow" Wrap - A Splash Of Floral Colors
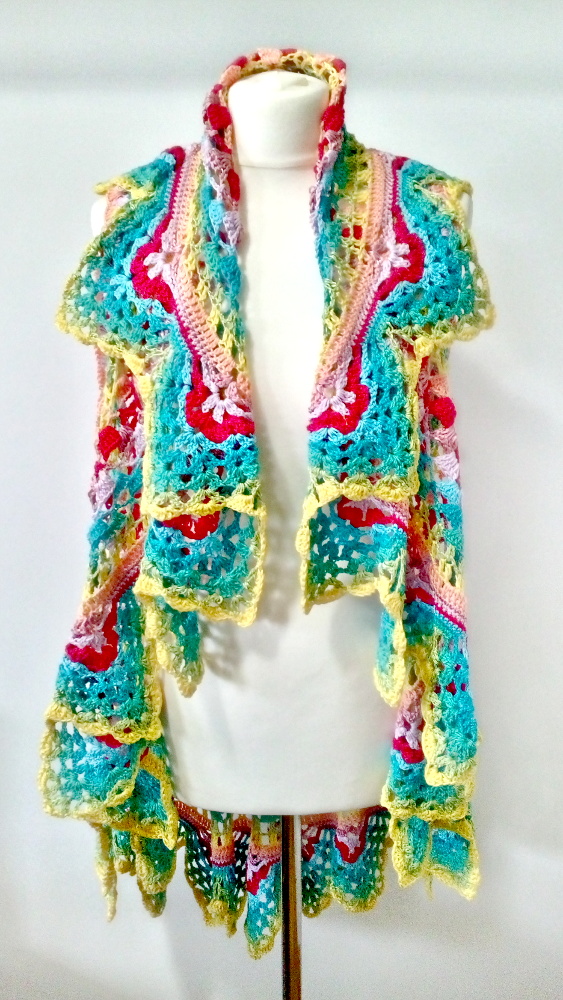
Colorful, playful, and absolutely fabulous piece of accessory – a must have in your wardrobe. Free diagram for spring crochet Rainbow Wrap.
A Splash of Color for Warm Days
Bring a touch of joy and vibrancy to your wardrobe with this stunning Crochet Rainbow Wrap, perfect for late spring and summer. Made in a cascade of radiant rainbow shades, this wrap adds brightness and movement to every outfit.
Designed with practical arm openings, it can be worn in multiple ways. You can leave it open for a relaxed, flowing look, fasten with a brooch for elegance, or tie with a belt for a more defined silhouette. The rich, triangular lace border adds flair and fullness, giving the wrap a playful, bohemian charm that turns heads.
Although Rainbow Wrap isn’t my original design, I’ve prepared short, easy-to-follow crochet instructions to help you bring the diagram to life — making the creative process smooth and enjoyable even if you’ve never tried such a pattern before.
Size
XL/XXL
Price
Free Instructions
Crochet Rainbow Wrap Design & Origin
This wrap is not my design. I found the photos and the pattern on the Internet but, unfortunately, I don’t have the original source. A few readers have written to me saying that this wrap was published in a Polish edition of the magazine Diana. Therefore, take a look at the comments below as well.
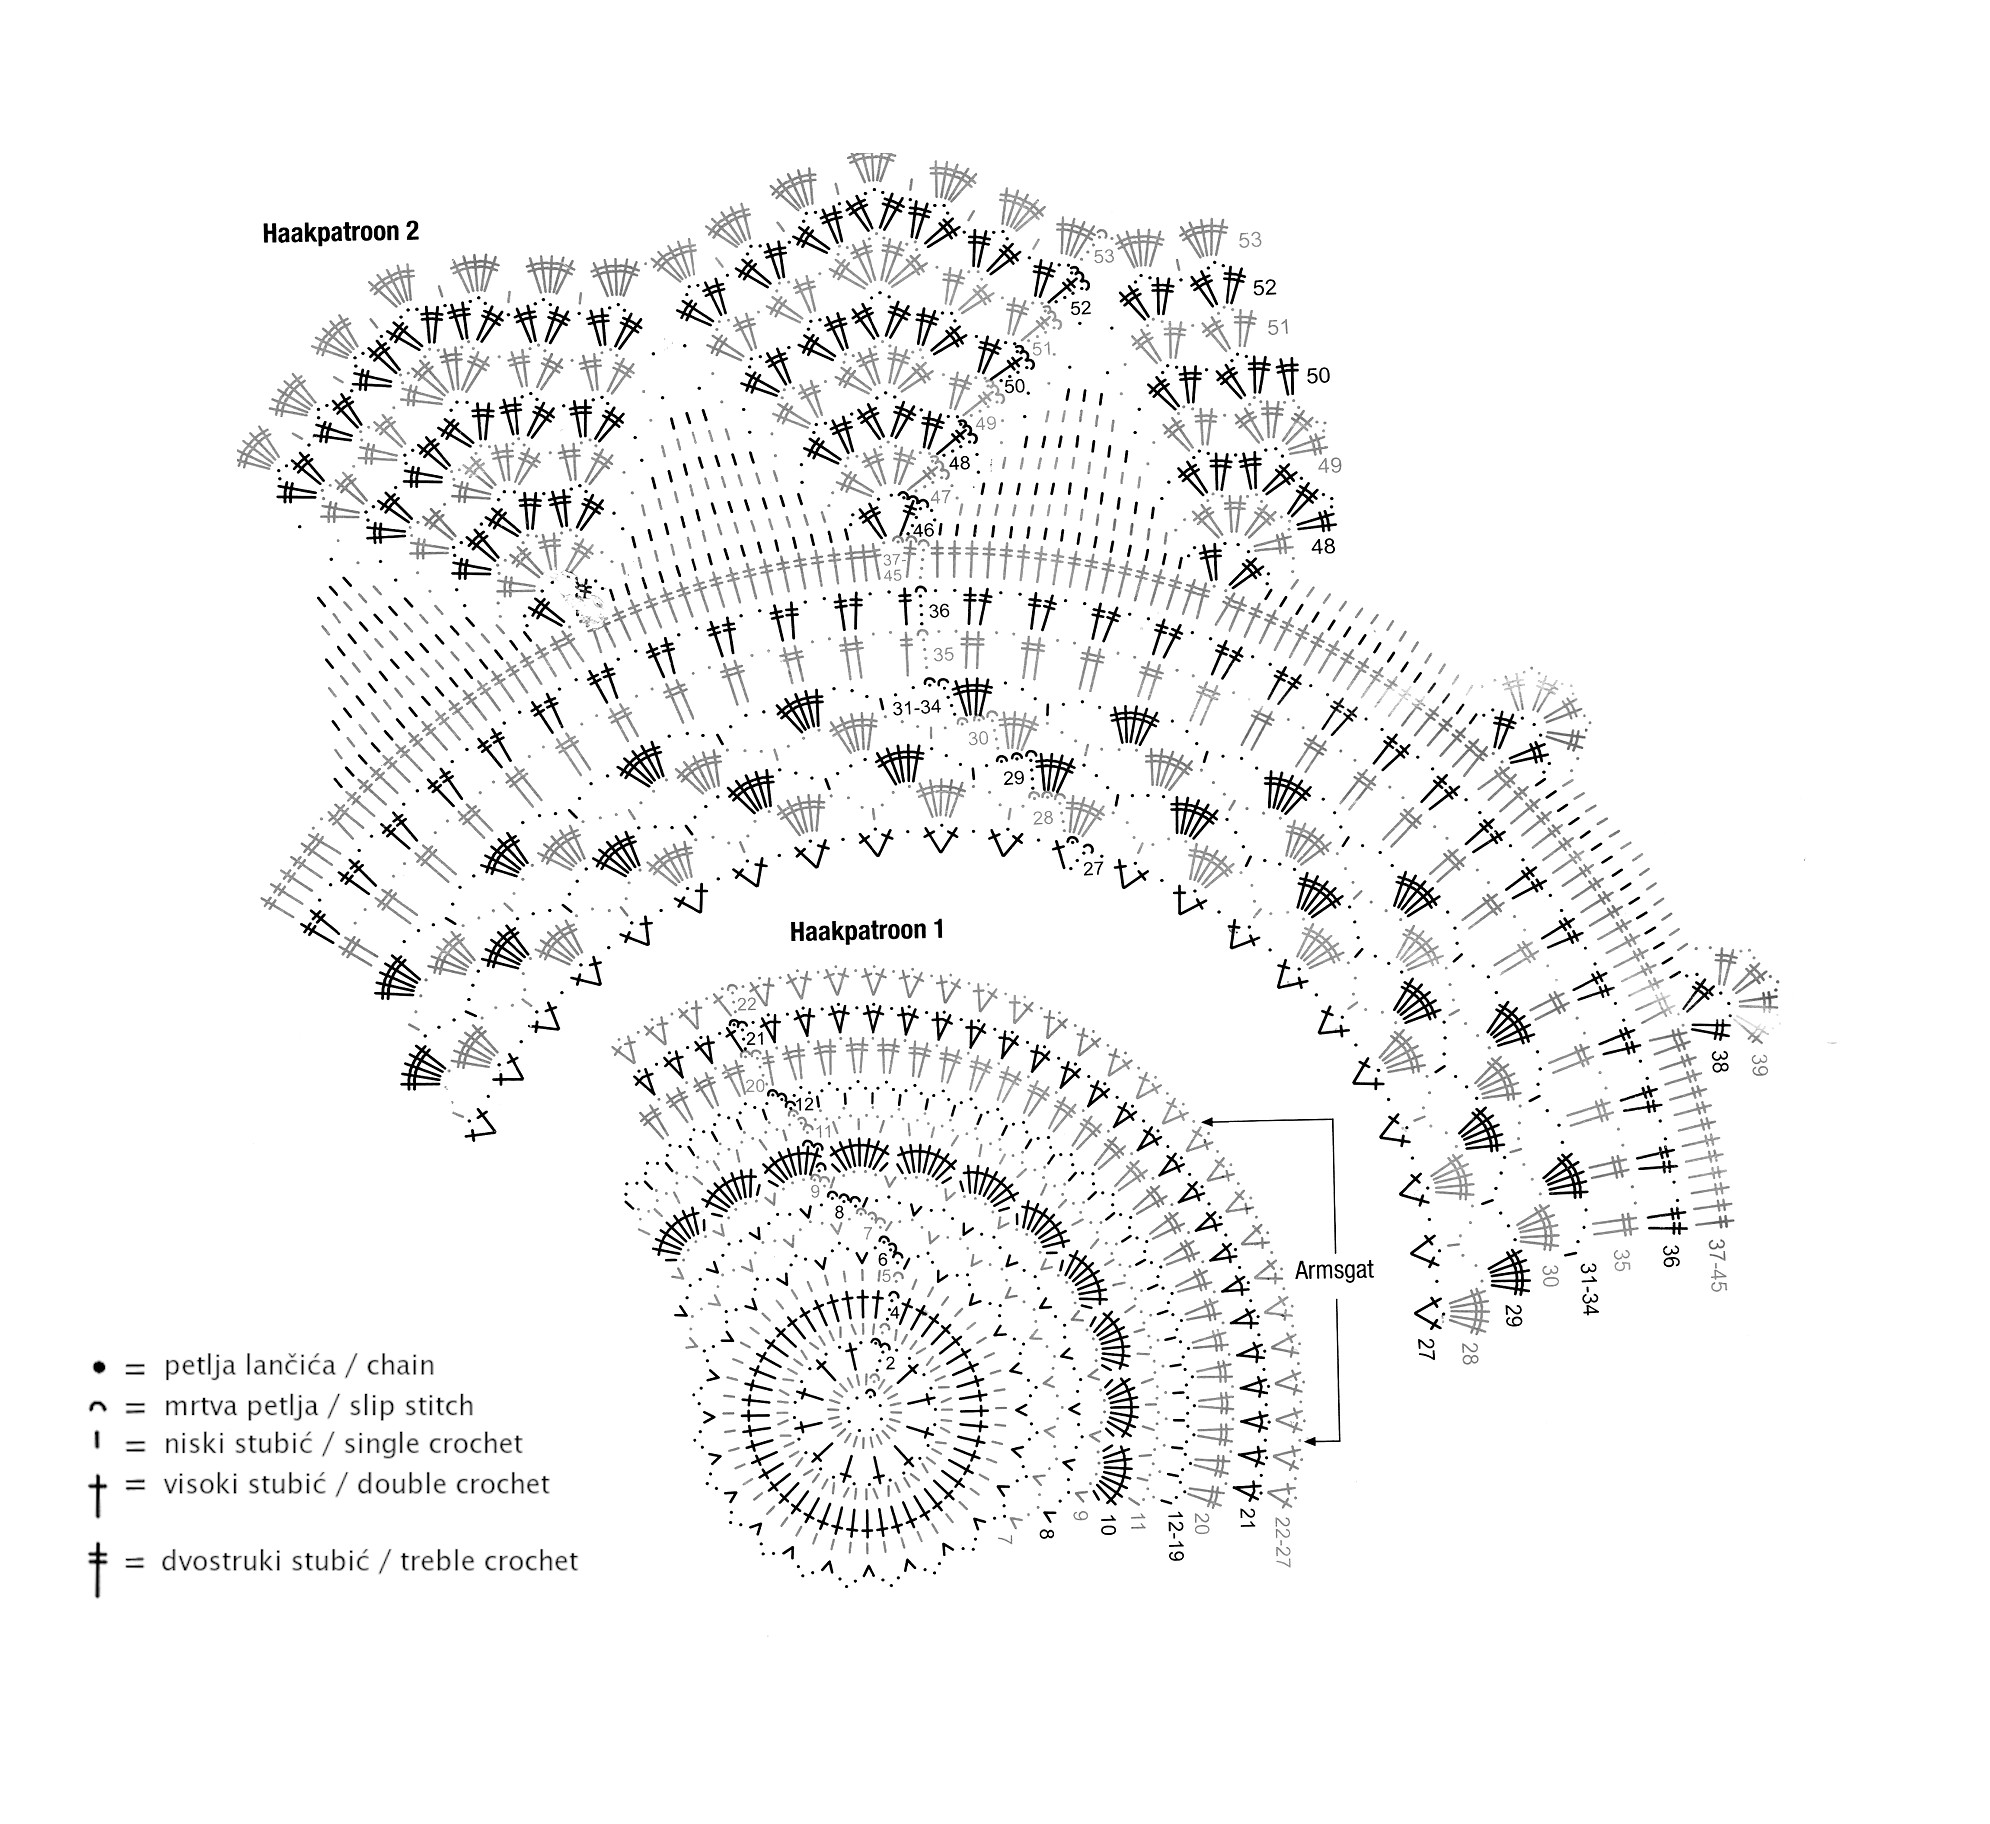
You crochet Rainbow Wrap by starting from the center and working in rounds. Along the way, you leave arm openings, then continue in rounds, following the diagram.
Instructions
Brief Instructions
The wrap is done in the rounds and it starts from the center, as shown in the diagram. In round 22 there are points showing arm openings. One of my readers kindly corrected this information, saying that arm openings should be in row 26, according to written instructions she has. Thank you so much for the correction!
Where to Place Arm Openings
Nevertheless, I advise taking into consideration dimensions of your body, and determine arm openings based on that. Placing arm openings will also depend on the type of your chosen yarn, hook size, and tension. Every crafter has their own tension, and the size of every piece will depend on that too.
This particular diagram which I have, proposes placing arm openings in places marked with arrows in rounds labeled 22-27, and with the word Armsgat (= arm opening). In round 26, on the marked places, you should do 1 single crochet where the arrows point, while between the arrows you will chain 35 for each opening. The next round instructs you to do stitches over other stitches as well as over the 35 chains.
Choice of Yarn, Tension
If your yarn is heavier, place arm openings earlier than round 26, and if you’re working with lighter yarn, place them later than shown on the Diagram. In any case, measure the piece on your body while working, just to make sure the openings are in the right position.
Share Your Rainbow Wrap Journey!
I’d love to see your version of the colorful, crochet Rainbow Wrap! Whether you chose bold rainbow shades or a softer palette, feel free to share your progress, finished photos, or even the little struggles you faced while making it. Leave a comment, tag me on social media, or send me a message. You never know, but your creativity and experience could inspire others to start their own rainbow project!
Want more crochet inspiration? Follow me on Pinterest for more crochet patterns!
Stay up-to-date with my latest crochet projects! Follow me on Instagram!
Thanks for the correction. I’m sure that the armpit can be started several rounds before or after the original instructions, depending on the yarn and hook that we’re using, as well as each individual tension. The best thing is to measure the piece directly onto the person who is going to wear it.
However, I really appreciate the constructive comment, it will definitely mean a lot to all crocheters. 🙂
Hello! Would you mind if I share your blog with my twitter group? There’s a lot of folks that I think would really appreciate your content. Please let me know. Thank you
Hello! I’m happy that you liked my blog. Of course, if they are groups about needlework or people who are interested in knitting, crochet and sewing, you can share it. I appreciate you asking firs.
Benia
Hello,
The pattern comes from Mała Diana Na Szydełku
Nr5 2010
It’s a Polish crochet magazine that doesn’t exist anymore. I had it but unfortunately can’t find it. I’m glad that my cellphone was able to matched the picture on your website and find it for me. The copy I found was very difficult to read. I was looking at it and look at my previous vest that I made to get it right. OMGsh I’m so glad that you have it on your blog. Thank you
Hi Benia!
I’m really happy that this post helped you and that you can now make this lovely piece. I must say I also enjoyed crocheting it, and would love to repeat it again some day. Thank you for the nice comment and good luck with this great wrap! 🙂





Actually I checked the original pattern and it’s says in a row 26 you need to omit 9 elements (36 chains) to make an armpit, not the 22 row.
Thanks for the correction. I’m sure that the armpit can be started several rounds before or after the original instructions, depending on the yarn and hook that we’re using, as well as each individual tension. The best thing is to measure the piece directly onto the person who is going to wear it.
However, I really appreciate the constructive comment, it will definitely mean a lot to all crocheters. 🙂
Hello! Would you mind if I share your blog with my twitter group? There’s a lot of folks that I think would really appreciate your content. Please let me know. Thank you
Hello! I’m happy that you liked my blog. Of course, if they are groups about needlework or people who are interested in knitting, crochet and sewing, you can share it. I appreciate you asking firs.
Hello,
The pattern comes from Mała Diana Na Szydełku
Nr5 2010
It’s a Polish crochet magazine that doesn’t exist anymore. I had it but unfortunately can’t find it. I’m glad that my cellphone was able to matched the picture on your website and find it for me. The copy I found was very difficult to read. I was looking at it and look at my previous vest that I made to get it right. OMGsh I’m so glad that you have it on your blog. Thank you
Hi Benia!
I’m really happy that this post helped you and that you can now make this lovely piece. I must say I also enjoyed crocheting it, and would love to repeat it again some day. Thank you for the nice comment and good luck with this great wrap! 🙂
Oh,dear! I had no idea. Thanks for letting me know. I’ll see what I can do about it.