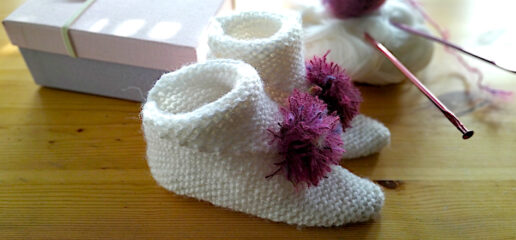
[:rs]"Origami" Pletene Patofnice Sa ćubicom [:en]"Origami" knitted home booties with pom-pom [:]
[:rs]Ispletite Origami Sobne Patofnice za decu i odrasle na 2 igle umesto na 4 ili 5, i podesite veličinu veoma lako za bilo koje stopalo.
[:en]Knit Origami Home Booties using 2 knitting needles instead of 4 or 5, and easily adjust the size to any foot.[:]
[:rs]Patofnice se pletu na 2 igle, sa okretanjem. Svi redovi pletu se pravim petljama. Ukoliko više volite glat bod, na licu pletite prave, a na naličju obrnute petlje.
[:en]The pattern for the Origami Booties proposes using 2 knitting needles, and working in turns. All rows are worked in knit stitches, but if you prefer stockinette stitch, you can knit on the right side and purl on the wrong side.[:]
[:rs]nivo[:en]level[:]
[:rs]Da biste ispleli Origami Patofnice, potrebno je da imate osnovno znanje u pletenju. Bodovi u ovom modelu su prave petlje, a potrebno je i umeće oduzimanja i dodavanja petlji.
[:en]To make Origami Home Booties, you will need basic knowledge of knitting skills. Stitches used in this pattern are knit stitches, and the instructions also presume that you are familiar with increasing and decreasing methods.[:]
[:rs]Materijal[:en]material[:]
[:rs]
- Oko 100 gr prediva
- Igle za pletenje br. 4
- Heklica br. 4 – opciono
- Igla za šivenje pletiva sa tupim vrhom i širokom ušicom
[:en]
- About 1 ball of yarn (100 gr) for needles 4 mm (UK size 8 / US size 6)
- Knitting needles 4 mm (UK size 8 / US size 6)
- Crochet hook 4 mm (US size G/6) – optional
- Yarn needle[:]
[:rs]veličina[:en]size[:]
[:rs]Origami Patofnice mogu se uraditi kako za decu tako i za odrasle, jer je pisano uputstvo prilagodljivo za sve veličine. Najbolje je izmeriti dužinu stopala, i od te mere oduzeti 1-2 cm. Ukoliko niste u prilici da izmerite stopalo, pogledajte tabele date na kraju ove objave.
[:en]Origami Home Booties can be made for children as well as for adults since the written instructions below allow you to adjust them to all sizes. The best option is to measure the foot length and then subtract 1-2 cm / 2.5 – 5 in. If you can’t measure the foot, use the size chart information given at the end of this post.[:]
[:rs]skraćenice [:en]abbreviations[:]
[:rs]p – petlja
pp – prava petlja
dod – dodati/dodavanje
odu – oduzeti/oduzimanje
[:en]st(s) – stitch(es)
K – knit
inc – increase
dec – decrease
[:]
[:rs]uputstvo [:en]instructions [:]
[:rs]Početak pletenja
Početi od prstiju (oznaka X na Dijagramu 1). Kako Dijagram 1 pokazuje, stranice kvadrata (oznaka a) treba da budu jednake dužini stopala. Linija c nalazi se na polovini stranice kvadrata, i po toj liniji će se kasnije gornji deo patofnice presaviti na spolja.
[:en]Beginning
Start from the toes (mark X on Diagram 1). As Diagram 1 shows, the sides of the square a should be equal to the foot length. Line c is placed at the half of the square side, and it is the folding line of the upper edge of the booty.[:]

[:rs]Dijagram 1
[:en]Diagram 1
[:]
[:rs]Izračunavanje broja petlji za prste
Pletenje patofne
Odatle počnite oduzimanje – na početku svakog reda oduzmite 1p. Pletite na ovaj način dok na igli ne ostanu 3p. Sve petlje završite u 1 redu. Odsecite nit i uvucite je u pletivo.
Slika dole pokazuje kako treba da izgleda gotov ispleten komad.
Savet – dodavanje i oduzimanje petlji radite posle prve ivične petlje. Na taj način imaćete lepu lančanu ivicu.
[:en]Calculating the number of stitches for toes
The width marked with X (toes) is supposed to be about 10cm for a female foot, and 12cm for the male foot. When the booty is folded, we get half of that measurement. To calculate the number of stitches, knit a swatch piece. On the swatch measure 10 (12)cm and count the number of stitches on that length. This will be the number of stitches to begin with. For children’s booties, you can start with 10 sts.
Knitting the booty
Cast on the needed number of sts as explained above.
Row 1 – work all K sts. Turn.
Row 2 – Inc 1, K to the end of row. Turn.
Repeat row 2 until the side marked with a (i.e. from X to b) measures the foot length. This length can be 1-2 cm shorter than the foot because knits always stretch a bit when worn.
From this point on continue with decreases – at the beginning of each row dec 1, then K to the end of row. Knit the piece until there are 3 sts left. Cast off all sts in one row. Cut yarn, weave in end. The photo below shows the look of a finished booty.
Tip – work inc and dec after the 1st K st. That way you will have a neat edge.
[:]

[:rs]Sastavljanje
[:en]Assembling
Fold the piece in half vertically, as shown in Diagram 2 – sides a should be lined up.
Sew sides a along the red line, but leave the part marked with X unsewn for now. Then sew the sides between lines b and c. Cut off yarn and weave in end. Next, squish the booty to be flat so that the seam lies in the middle. Now sew the opening X at the toes. Turn the booty inside out, fold the little unsewn triangle along side c.
[:]

[:rs]Dijagram 2
[:en]Diagram 2
[:]
[:rs]Završna obrada
Na isti način ispletite i drugu patofnu.
[:en]Finishing
If you want, you can do 1 round of half double crochet around the upper booty edge using a crochet hook.
Make a pom-pom and sew it onto the tip of the folded part. How to make the perfect pompom video tutorial.
Make the other booty in the same way.[:]
[:rs]Tabela veličina obuće za decu i omladinu.
[:en]Chart showing shoe sizes for children and teenagers
[:]

[:rs]Tabela veličina obuće za odrasle.
[:en]Chart showing shoe sizes for adults in cm.
[:]

[:rs]Heklane Origami Patiofnice[:en]Crochet Origami Booties[:]

[:rs]
- Da li želite više inspiracije za heklanje? Zapratite me na Pinterest-u i pronađite još sjajnih ideja!
- Budite u toku sa najnovijim projektima ručnog rada. Posetite moj Instagram profil!
[:en]