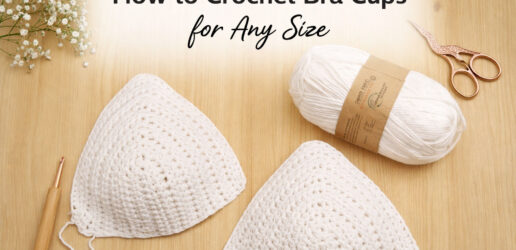
[:rs]Kako da isheklate grudne korpice za bilo koju veličinu [:en]How To Crochet Bra Cups For Any Size [:]
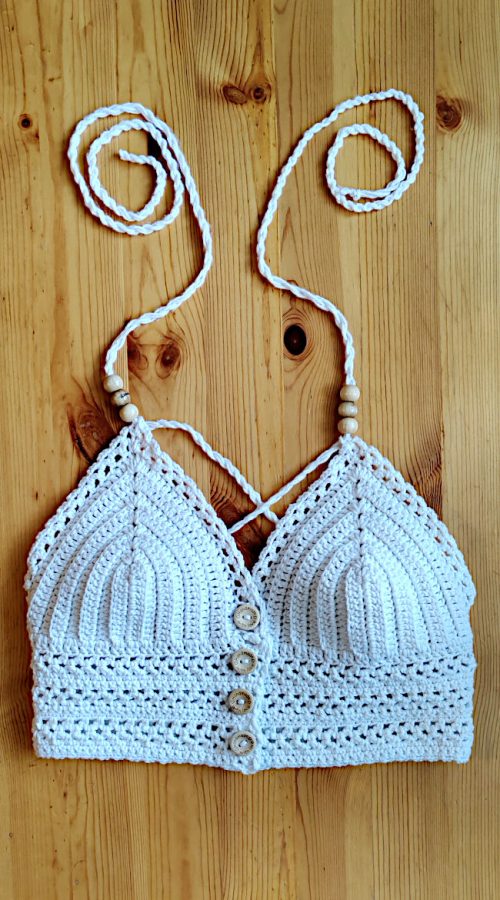
[:rs]Heklane korpice mogu biti deo topa, bluzice, haljine, ili bikinija
[:en]Crochet bra cups can be a part of a top, blouse, dress, or a bikini[:]
[:rs]Heklane grudne korpice možete uraditi vrlo brzo, za sat vremena ili manje. Zavisno od brzine kojom heklate, korpice ćete isheklati za tili čas uz ovaj besplatni tutorijal. Skrolujte dole za detaljno uputstvo.
[:en]You can crochet bra cups in an hour or less than that. Depending on your crochet speed, you’ll make them in no time with my free tutorial. Scroll down for a full set of instructions.[:]

[:rs]nivo[:en]level[:]
[:rs]Za heklanje grudnih korpica, potrebno je niže srednje znanje u heklanju. Bodovi u ovom modelu su lančići i visoki stubići.
[:en]To crochet the bra cups, you will need lower intermediate knowledge of crocheting skills. Stitches used in this tutorial are chain and double crochet.[:]
[:rs]Materijal[:en]material[:]
[:rs]
- Oko 25gr pamučnog prediva za heklicu 3-3,5mm; 50gr = 125m
- Heklica br. 3,5
- Igla za šivenje pletiva sa tupim vrhom i širokom ušicom
[:en]
- About 1/2 a ball of sport cotton yarn (25 gr) for 3-3.5mm hook; 50gr = 125m
- Crochet hook 3.5mm
- Yarn needle[:]
[:rs]veličina[:en]size[:]
[:rs]Prilagodljivo za sve veličine
[:en]Adjustable to any size[:]
[:en]Sizes & Measurements
This tutorial doesn’t propose standard measurements but is rather intended to fit the bra cups according to your own proportions. Therefore, you will be doing some measurements of your body before you start crocheting the bra cups.
On the other hand, in the instructions below, the number of rows for different sizes is given in the following format: S-M-L-XL-XXL-XXXL.
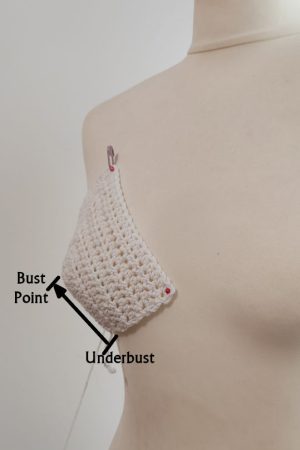
Bust Point To Underbust
In order to get the right size and shape of the cups, you’ll need to measure bust point to underbust. To do that, look at the photo on the right (photo below if you’re using a mobile/tablet), and run the measuring tape from your bust point (the nipple) to the underbust (where your breast ends). Write this measurement down which you will use to crochet a chain of the corresponding length. Depending on your breast size, this number is about 8-15cm / 3-6in.
[:rs]Veličine & Mere
Ovaj tutorijal ne podrazumeva standardne mere, već je zamišljen tako da izradu korpica prilagodite svojim dimenzijama i obliku tela. To znači da ćete pre početka rada uzeti svoje mere.
Sa druge strane, u uputstvu dole, broj redova za svaku veličinu ponaosob dat je u formatu S-M-L-XL-XXL-XXXL.
Vrh grudi do ispod grudi
Da biste dobili adekvatnu veličinu i oblik korpica, biće potrebno da izmerite rastojanje od vrha dojke do ispod grudi. Pogledajte fotografiju desno (fotografiju ispod ako koristite telefon ili tablet) i na osnovu nje vodite krojački metar od vrha dojke (tj. bradavice) do dela ispod grudi (gde se dojka završava). Zapišite ovu meru koja će Vam koristiti kao polazna tačka za heklanje početnog lančića. Zavisno od Vaše veličine grudi, ovaj broj kreće se u rasponu 8-15cm.[:]
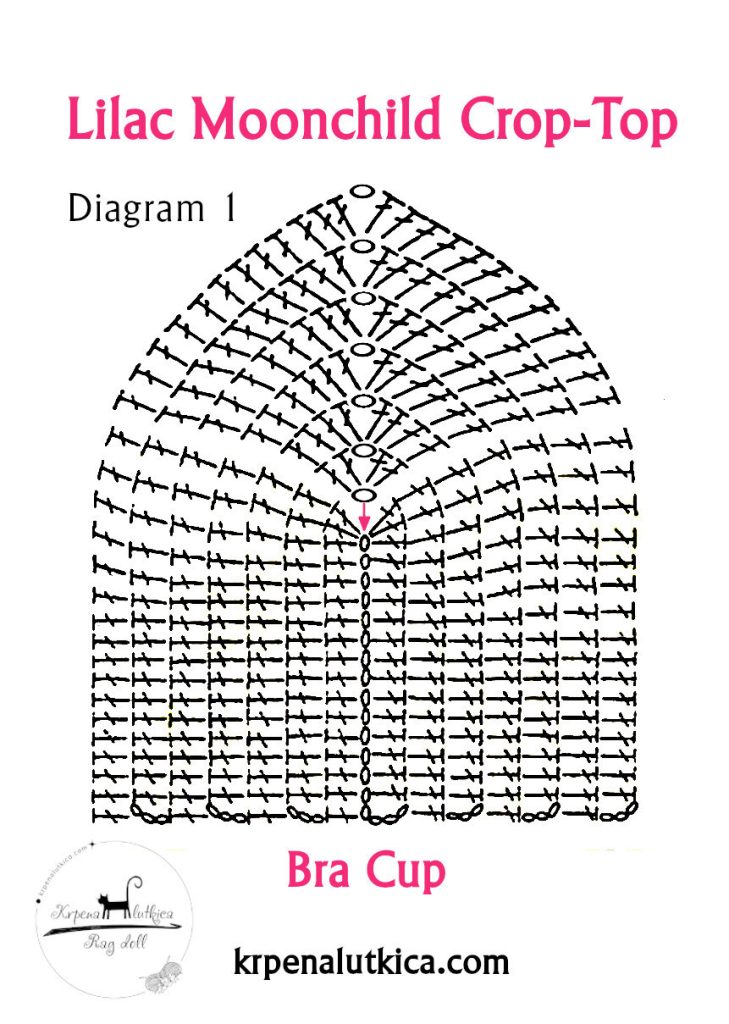
[:rs]Dijagram
Dijagram 1 prikazuje izradu jedne korpice. Početak je kod roze strelice, a nakon izrade početnog lančića, radićete stubiće duž jedne strane lančića, zatim ćete uraditi ugao, pa nastaviti stubiće duž druge strane lančića. Tek tada ćete okrenuti rad.
Isti dijagram koristi se i za izradu podloga koje sprečavaju providnost korpica, tj. kao vrsta postave. Podloge za korpice imaju 2 reda manje od samih korpica.
[:en]Diagram
Diagram 1 shows the make of one cup. The start is at the pink arrow, and after completing the initial chain, you will be working along upper side of the chain, make the corner, and then continue along the bottom side of the chain. Only then do you turn your work.
The same diagram is used for bra pads which serve as a kind of lining, to prevent transparency. However, bra pads will have 2 rows less than the cups.[:]
[:rs]Skraćenice
[:en]Abbreviations[:]
[:rs]p – petlja
pl – petlja lančića
vst – visoki stubić
pm – postavite marker
[:en]st(s) – stitch(es)
ch – chain
dc – double crochet
pm – place marker[:]
[:rs]uputstvo[:en]instructions [:]
[:rs]Desna korpica
Počnite izradom lančića koji će biti dužine Vaše mere Vrh grudi do ispod grudi. Važno je da lančić ima neparan broj petlji. Radite sa okretanjem, prateći Dijagram 1 i uputstvo u daljem tekstu.
1. red – 2pl, vst u 4.p od heklice, vst do poslednje p. U poslednju pl:(3vst, 1pl, pm, 3vst). Nastavite duž druge, suprotne strane lančića – vst do kraja reda. Okrenite rad.
2. red – 2pl, vst u 4.p od heklice, vst do markera, u pl radite:(2vst, 1pl, 2vst), premestite marker na pl ugla; nastavite vst do kraja reda. Okrenite rad.
Ponavljajte 2. red dok ne budete imali: 6-7-8-9-10-11 redova, ili onoliko redova koliko je potrebno da korpica sasvim prekrije dojku.
Poslednji red (opciono, ovo je ukrasni, ažur red) – 3pl, (preskočite 1p, vst, 1pl)ponavljajte do markera; u 1pl radite:(vst, 1pl, vst), uklonite marker. Nastavite do kraja reda ovako: (1pl, preskočite 1p, vst). Prekinite nit, uvucite višak niti u pletivo.
Leva korpica
Napravite levu korpicu kao desnu.
Savet
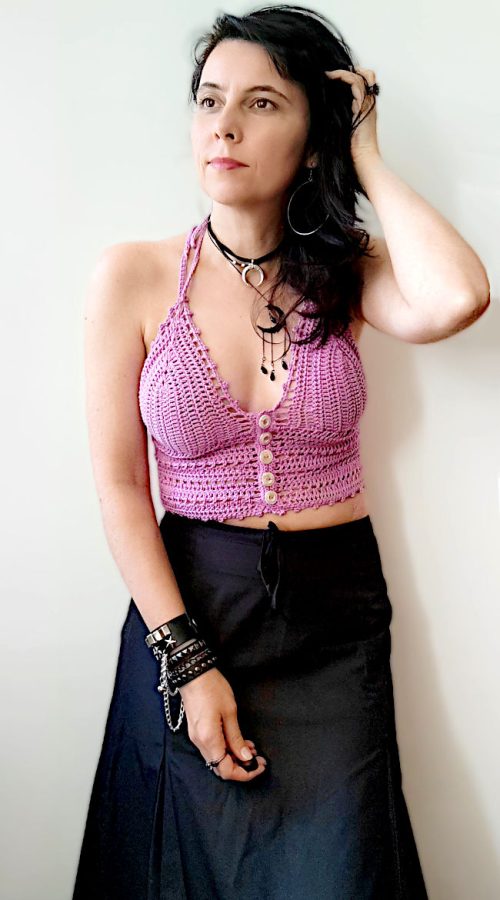
Ako heklicom ubadate samo u zadnji beočug svake petlje, dobićete reljefnu strukturu korpica. Bela varijanta modela Heklani Top Lila Mesečevo Dete koji vidite dole, prikazuje upravo takvu rebrastu strukturu korpica.
[:en]Right Cup
Start by chaining as many sts as you need to get your Bust Point to Underbust Measurement, but make sure you have an odd number of sts. Work in turns, following Diagram 1 above, and written instructions below.
Row 1 – Ch2, dc in 4th st from hook, dc to the last st; in last st:(3dc, ch1, pm, 3dc). Continue working along the other side of the chain – dc to the end of row. Turn.
Row 2 – Ch2, dc in 4th st from hook, dc to the marker; in ch1-sp:(2dc, ch1, 2dc), move marker to ch1-sp. Continue with dc in each st till the end of row. Turn.
Repeat Row 2 until you have a total of: 6-7-8-9-10-11 rows, or as many rows as you need to fit your boob in it.
Last row (optional, it’s a decorative, lacy row) – Ch3, (sk1, dc, ch1)repeat to the marker, in ch1-sp:(dc, ch1, dc), remove marker. Continue to the end of row like this: (ch1, sk1, dc). Break yarn, weave in end.
Left Cup
Make the left cup in the same way.
Extra Tip
If you insert the hook in back loops only, you’ll get a ribbed texture. This is the case with the white crop-top below – Lilac Moonchild Crop-Top.[:]
[:rs]💛 Želite još inspiracije za heklanje?[:en]💛Need more crochet inspiration?[:]
[:rs]Ovaj komad je samo deo priče. Cela Kolekcija Mesečevo Dete vas čeka ovde.
[:en]This piece is just the beginning. Discover the full story in the Moonchild Collection.[:]
[:rs]Povezana objava [:en]Similar post [:]
[:rs]Crop-Top Lila Mesečevo Dete[:en]Lilac Moonchild Crop-Top[:]
[:rs]
- Da li želite više inspiracije za heklanje? Zapratite me na Pinterest-u i pronađite još sjajnih ideja!
- Budite u toku sa najnovijim projektima ručnog rada. Posetite moj Instagram profil!
[:en]