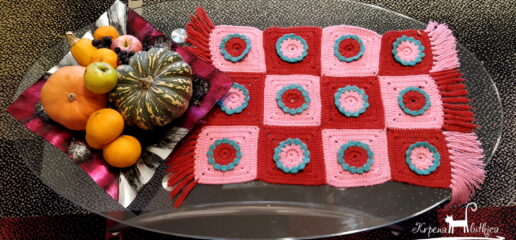
Patchwork table mat from leftover yarn
Bold color combination in round crochet technique

Daring color combination
With its bold color work, this tiny crochet patchwork table mat defies many color matching rules. However, although maybe a bit too perky, it turned out to be quite well balanced in my opinion.
From my dad, who is a painter, I learned a lot about colors, and one of the rules is that red and pink, as well as red and green, are not such a good match. “Irreconcilable” colors, however, can become friends if one of them is significantly darker than the other, and in case that one color dominates a larger surface, while the other one is just in details. We could say that in the case of this crochet patchwork piece my choice of turquoise yarn is in details, while the red is much darker than the pink. On the other hand though, pink and red motifs of this table mat are equally present, so I guess I’ve broken the above mentioned rule.
Anyhow, examples like this can teach us that breaking basic rules can sometimes lead to beauty and harmony.
From bathroom rug to table mat
My initial idea was to use this crochet patchwork piece as a bathroom mat. Nonetheless, I got to like it so much that I felt sorry seeing it get dirty on the floor, so I repurposed it as a table mat for my living room coffee table.
The table mat consists of 12 square pieces which all have a flower motif in the center, whose petals are separated from the rest of the square. This effect is known as “overlay crochet”, which means that in certain rows/rounds you insert the hook a few rows/rounds below, and often at the wrong side of your work. This method gives us the effect of overlapping and 3D.
The finished table mat has added fringe on two shorter sides.
This is an ideal weekend project, a leisure activity for a time when you want to make something quickly, but also use leftover yarn laying around your stash and making a mess in the house.


Level
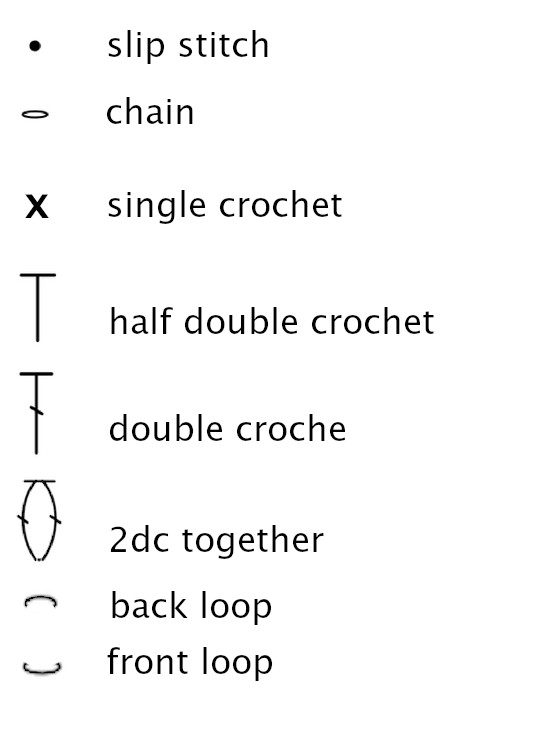
To make this patchwork table mat, you will need basic knowledge of crochet skills with experience and also crocheting in the rounds. Stitches used in this pattern are chain, slip stitch, single crochet, half double crochet, double crochet.
material
- 2 balls of yarn (200 gr) for hook 3-4 mm (about 90 gr red, 90 gr pink, leftovers of turquoise)
- Crochet hook 3.5 mm
size
- Whole piece – 52 x 39 cm without fringe
- 1 square – 13 x 13 cm
- Fringe – 7 cm
abbreviations
Diagram Symbols
instructions
Colorwork
Square A – 2 rnds red, 1 rnd turquoise, 5 rnds pink
Square B – 2 rnds pink, 1 rnd turquoise, 5 rnds red
Diagrams
In the text that follows you will find detailed written instructions for crocheting the square motifs for this patchwork table runner. However, if you find it easier to crochet by looking at diagrams, for rounds 1 – 3 follow Diagram 1, and for rounds 4 – 8 follow Diagram 2.
Diagram 1

Diagram 2

Square A
Start with red color. Ch6 and close the ring by doing a sl.st in 1st loop. Continue working in the rounds.
From rnd 1 to rnd 3 follow Diagram 1.
Rnd 1 – ch3, 11dc in the ring. Sl.st in 3rd loop of the initial ch but insert the hook in its front loop.
Rnd 2 – Work this rnd in FRONT loops only (later you will be working rnd 4 in back loops of this rnd). Ch3, 1dc in first st, ch2, *2dc together in next st, ch2*. Repeat from * to * 10 more times. Sl.st in 3rd loop of the initial ch. Break yarn, change to turquoise.
Rnd 3 – With turquoise color, in 1st ch2-space [ch1 (doesn’t count as a st), 5sc, sl.st in top st of 2dc from previous rnd]. In each next ch2-space work 5sc, then a sl.st in top st of 2dc from previous rnd. Finish this rnd with a sl.st in the initial ch1. Break yarn, weave in end, change to pink.
For rnds 4 to 8 follow Diagram 1.
Rnd 4 – With pink color work in BACK loops of rnd2. You will find these back loops on the wrong side of the work. Attach yarn to one of these back loops and work like this: 1sc in each back loop = 12sc. Sl.st. in first sc done in this rnd.
Rnd 5 – From this rnd on, work in both loops. Ch3, 1dc in 1st st, 2dc, 2dc in next st, *ch2 (= corner), 2dc in the same st, 2dc, 2dc in next st*. Repeat from * to * 2 more times. 1hdc in 3rd loop of the initial ch3, making sure you insert the hook in both front and back loops of this st.
Rnd 6 – In first hdc corner space (ch3, 1dc), then 6dc, *in next ch2-space(2dc, ch2, 2dc), 6dc*. Repeat from * to * 2 more times. 1hdc in 3rd loop of the initial ch3, making sure you insert the hook in both front and back loops of this st.
Rnd 7 – In first hdc corner(ch3, 1dc), 10dc, *in next ch2-corner(2dc, ch2, 2dc), 10dc*. Repeat from * to * 2 more times. 1hdc in 3rd loop of the initial ch3, making sure you insert the hook in both front and back loops of this st.
Rnd 8 – In first hdc corner(ch3, 1dc), 14dc, *in next ch2-corner(2dc, ch2, 2dc), 14dc*. Repeat from * to * 2 more times. 1hdc in 3rd loop of the initial ch3, making sure you insert the hook in both front and back loops of this st.
Break yarn, weave in end.
Square B
Work like square A but follow the color order as indicated above.
Make a total of 12 squares – 6 Squares A and 6 Squares B. Join squares by alternating motifs A and B as shown in the photos. When joining, insert the hook in back loops only from the wrong side. Join 4 squares in 3 rows.

Finishing
Fringe
Cut pieces of yarn 20 cm long, fold them in half and attach to the short sides of the finished piece. There should be 3 pieces of yarn folded in half for 1 loop. In order to keep the contrast of alternating the 2 colors, like shown in the photos, attach pink yarn fringe onto the sides of red squares, and red fringe onto the sides of pink squares, .
Finally, spray the finished piece with water, press over a clean, cotton cloth and leave to dry. Trim the fringe with scissors.

Donate If You Can
If my handmade items and designs have brought you inspiration and joy, consider making a small donation to support my work. Your generosity helps me continue crafting beauty, one stitch at a time. Even the smallest amount can go a long way.
Thank you for being a part of art and beauty in handicraft.