A Layered Summer Dress That Flatters, Flows, and Feels Amazing
One of My Favorites—Here’s Why
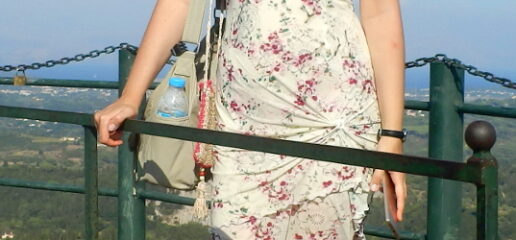
The layered summer dress Rosalie is one of my most loved warm-weather pieces. It’s simple to sew, endlessly flattering, and incredibly fun to wear. Made from light jersey fabric in two flowing layers, it’s breathable, body-hugging in all the right places, and completely adaptable to your shape and style.
The Design: Soft Drapes and a Blooming Touch
This layered summer dress is constructed from two layers of jersey—each cut identically, except the upper layer is about 10 cm shorter than the lower one. The beauty of this dress lies in the freedom it offers: the top layer can be gently draped and pinned to suit your mood or occasion. On one side, it’s gathered slightly and accented with a flower detail that adds just the right amount of romantic flair.
From Thigh to Heart: Two Variations
When I first made this dress, I left the top edge straight across the bust and attached the flower detail on the thigh where I the draped the fabric.
Later, I updated the neckline by gently gathering the center with hand stitches to create a soft, heart-like shape—and moved the flower to bloom right at the cleavage. This final version is the one I wear to this day. It feels even more feminine and sculpted, with a unique, handmade charm.
The initial look: the upper cleavage edge is straight, there is a flower attached onto the draped spot on the thigh.
A bit modified look: I gathered the cleavage line with hand stitching to get a heart-like shape, and I removed the flower to this spot from the thigh where it used to be.
Custom Fit, Maximum Flattery
The layered summer dress Rosalie is meant to be sewn just for you. In the blog post, I provide complete, step-by-step instructions for drafting the dress based on your own measurements. No commercial patterns needed—just a soft measuring tape, some jersey fabric, and a bit of sewing confidence.
The result? A close-fitting silhouette that celebrates your curves, while the double layers and fine fabric create movement, comfort, and elegance.
Make It Yourself
If you’d like to create your own version of the Layered Summer Dress Rosalie, read this blog post to the end for detailed directions, body-specific drafting advice, clear diagrams, and all the little tricks I’ve learned along the way.
This is summer sewing at its best—minimal effort, maximum beauty.
level
To make this layered summer summer dress Rosalie, you will need basic knowledge of sewing skills.
material
Two lengths of stretch fabric 140 cm in width; measure the length from armpit to the knees
Tracing paper
Sewing machine, thread, scissors, measuring tape
size
Adjustable to all sizes
instructions
Back Panel
Step 1
Diagram 1
To make the pattern for this dress, draw a rectangle on a large piece of tracing paper. Its dimensions should be: width – 1/2 the width of your hips (or your bust depending on which measure is bigger). The length of the rectangle is the length of your dress (counting from your armpit). Measure 10 cm from the bottom edge – this will be the length of the upper layer of fabric which is 10 cm shorter than the lower one.
Draw a vertical line right in the middle of the rectangle. Also, measure the length from your bust to your waist and from your waist to hips and draw these horizontal lines too, as shown on Diagram 1.
Step 2
Diagram 2
Draw 2 vertical red lines, like shown in Diagram 2. Each of those lines should be placed in the middle of each half of your diagram.
Step 3
Diagram 3
Now measure 1 cm to the left and 1 cm to the right in the place where each vertical red line intersects with the horizontal black line. Draw lines as shown on Diagram 3 to get a diamond shape. This will be your darts for shaping the waist. So, the widest part of the diamond should be 2 cm.
Step 4
Diagram 4
To construct the side lines for the waist, you will need to divide your hip (or bust measurement) by 2, and then subtract half of your waist measurement from it. Next, subtract 2 cm from the result. For easier calculation, use this formula:
(Hip/2 – waist/2 – 2cm) = X
The green line and the symbol X on Diagram 4 represent the number of cm that you will subtract from each side line of the rectangle.
Example
Let’s say the hip measure is 90 cm and waist 70 cm. Half of these measures are 45 and 35 cm. We subtract the waist measure from the hip measure: 45 – 35 = 10 cm.
We divide this result by 2 = 5 cm.
In the end, we subtract 2 cm from the final result: 5 – 2 = 3 cm. This shows us by how many cm we need to narrow the waist measuring from the sides of our rectangle – red lines on Diagram 4.
This is the finished back panel of our dress pattern.
Front Panel
Step 5
To construct the front panel of the dress pattern, use your finished back panel but make a few changes to the darts.
First, measure the bust depth – this is the length from your nipple to the place where your breasts end below. See the photo where the arrows show the place of the nipple and the end of the breast.
Diagram 5
Use the measurement of the bust depth for the next step – draw a new parallel line below the original bust line. The green lines on Diagram 5 show the bust depth measurement. Start the upper half of the dart from the newly constructed line, and leave the lower half of the dart as it is on the back panel.
Red lines on Diagram 5 show the new darts and the bust depth line.
Step 6
Diagram 6
The next step is to add a stripe above the bust line as the red line shows in Diagram 6. The stripe is about 7cm wide and on each side about 1.5 cm shorter than the bust line.
This is the finished pattern for the front panel of the dress.
Step 7
Diagram 7
To complete the pattern, curve the sharp side lines from the bust line to the hip line on both front and back panels, and make them softer, like the blue lines show on Diagram 7.
Cutting:
Lay your fabric on a flat surface and cut 2 front and 2 back pieces making sure that one set of front and back is 10 cm longer than the other. For straps cut 2 stripes 5 cm wide and 60 cm long.
Sewing:
1. Sew the darts of all pieces.
2. Sew the sides of one front and back panels, and then the sides of the other back and front panels.
3. With right side on wrong side, lay the 2 layers of the dress together, making sure that the longer layer is laid on the short one with the right side facing up. The back panels should be lined up and front panels lined up as well. Sew the upper edges together.
4. Set your machine to the smallest zigzag stitch and stitch the hem to make it wavy. To do that, stretch the material while you stitch it.
5. Sew elastic band onto the upper edge. Flip the dress inside out.
6. Fold the straps in half along the long sides with right sides inside, stitch along longer edges and turn them inside out. Sew them to the dress fitting to your figure.
7. Gather one bottom side of the upper layer of the dress. After sewing the gather, attach a rose made from the leftovers of the same material.
Below you can see 2 brilliant video tutorials:
Basting/Running stitch for creating gathers on fabric
How to make the simplest, yet, the most beautiful rose without sewing with thread
Hand sewn gathers
Simple Rose from Fabric
No Sew Method
Another version of the same dress in purple shades made from net jersey
In Memory of a Friendship
Rosalie was the name whispered into my life by a friend who’s no longer here, but whose presence still lingers in the most unexpected, tender places. He gave me that nickname as if he knew I’d one day need a softer version of myself to hold onto. This dress is more than jersey and stitches—it’s a bloom from memory, a layer of light sewn in honor of someone who saw the flower in me before I even started to unfold. To him, and to the beauty of remembrance, this piece is quietly dedicated.
✂️ Share Your Bloom
Have you sewn your own Rozalija? I’d love to see it! Tag me on Instagram or use the hashtag #RozalijaDress to be featured.
💌 Subscribe for More Handmade Stories
Want to hear about my next heartfelt project? Subscribe to the newsletter for new patterns, sewing tips, and inspiration straight from the studio. 👉 Click here to subscribe
Donate If You Can
If my handmade items and designs have brought you inspiration and joy, consider making a small donation to support my work. Your generosity helps me continue crafting beauty, one stitch at a time. Even the smallest amount can go a long way.
Thank you for being a part of art and beauty in handicraft.