[:rs]Isheklajte Vilu sa krilima u 12 koraka [:en]Crochet a winged angel fairy doll in 12 steps [:]
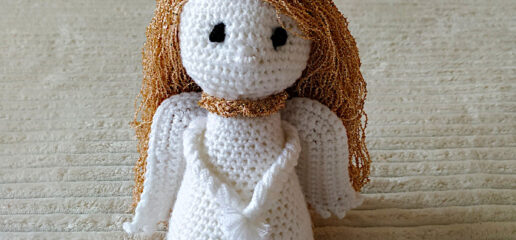
[:en]Sylphide is a crochet winged fairy doll, the main character of the book for children called Sylphide And The Elf With A Flute. This lovely little fairy with a crown and a magic wand will tell her fairy tale to your favourite girl. Along with her wings, Sylphide got special magic power – she can make good wishes come true.[:rs]Silfida je heklana dobra vila, glavna junakinja bajke za decu Silfida i Vilenjak sa frulom. Ova preslatka vila sa krilima i čarobnim štapićem će ispričati svoju bajku vašoj mezimici. Silfida je uz krila dobila i dar kojim može da ispunjava dobre i plemenite želje.[:]


[:rs]nivo[:en]level[:]
[:rs]Za heklanje lutkice-vile, potrebno je srednje znanje u heklanju. Bodovi korišćeni za lutku i krila su petlje lančića i niski stubići, a za krunu petlje lančića, niski stubići, poluvisoki, visoki i dvostruki visoki stubići. Takođe, potrebno je poznavanje heklanja ukrug.
[:en]To crochet this winged fairy doll, you will need intermediate knowledge of crocheting skills. Stitches used in this pattern are chain and single crochet for the doll, while for the crown I used chain, single crochet, half double crochet, double crochet and treble crochet. Additionally, you should be familiar with round crochet.[:]
[:rs]Materijal[:en]material[:]
[:rs]
- Oko 50 gr belog prediva za telo, glavu, krila i krunu, debljine za heklicu 3 mm
- Oko 50 gr tankog zlatnog prediva za kosu, krunu, rub i kragnicu haljinice
- Heklica br. 3,5
- Igla za šivenje pletiva sa tupim vrhom i širokom ušicom
- Silikonska pahulja za punjenje tela i glave
- Drveni štapić dužine oko 20 cm za čarobni štapić
- 2 manja tabaka svetlucavog kartona u crvenoj i roze boji za vrh čarobnog štapića
- Komad ukrasne trake u crvenoj ili roze boji za dekoraciju čarobnog štapića
[:en]
- About 1 ball of white yarn (50 gr) for a 3 mm hook for the body, head, wings and crown
- About 1 ball of thin golden yarn (50 gr) for the hair, crown, dress hem and collar
- Crochet hook 3.5 mm
- Yarn needle
- Silicon fiber stuffing
- Wooden stick for the magic wand about 20 cm in length
- 2 pieces of shimmering cardboard for the magic wand top in red and pink colors
- A small piece of decorative ribbon for the magic wand[:]
[:rs]veličina[:en]size[:]
[:rs]Lutkica vila Silfida visoka je oko 20 – 22 cm i teži 50 gr.
[:en]Fairy doll Sylphide is about 20 – 22 cm (7.8 – 8.6 in) tall and it weighs 50 gr[:]


[:rs]skraćenice [:en]abbreviations[:]
[:rs]p – petlja
pl – petlja lančića
nst – niski stubić
pvs – poluvisoki stubić
vst – visoki stubić (1 navoj)
dvs – dvostruki visoki stubić (2 navoja)
piko – 3pl, mrtva petlja u treću p od heklice
[:en]st(s) – stitch(es)
ch – chain
sc – single crochet
hdc – half double crochet
dc – double crochet (yarn over once)
tr – treble crochet (yarn over twice)
picot – ch3, sl.st in 3rd st from the hook
[:]
[:rs]uputstvo [:en]instructions [:]
[:rs]1. Telo
Držeći 2 niti belog prediva zajedno, počnite sa 2pl. Ostavite kraj niti oko 20 cm dužine da biste kasnije stabilizovali lutku.
1. red – U drugu pl uradite 6nst. Nastavite heklanje spiralno, tj. nemojte završavati redove mrtvom petljom. Postavite marker. Pomerajte marker na kraju svakog reda = 6p
2. red – (2nst u sl.p)6x. = 12p.
3. red – (1nst, 2nst u sl.p)6x = 18nst.
4. red – (2nst, 2nst u sl.p)6x = 24p.
5. red – (3nst, 2nst u sl.p)6x = 30p.
6. red – (4nst, 2nst u sl.p)6x = 36p.
7. red – (5nst, 2nst u sl.p)6x = 42p.
Od 8. do 12. reda – 1nst u svaku p, tj. bez dodavanja = 42p.
13. red – Počnite oduzimanje: (4nst, preskočiti 1p, 1nst)6x = 36p.
14 – 15 red – 1nst u svaki nst prethodnog reda = 36p.
16. red – (3nst, preskočiti 1p, 1nst)6x = 30p.
17 – 18 red – 1nst u svaki nst prethodnog reda = 30p.
19. red – (2nst, preskočiti 1p, 1nst)6x = 24p.
20 – 21 red – 1nst u svaki nst prethodnog reda = 24p. Izvucite početak duge niti sa početka rada na spolja.
22. red – (1nst, preskočiti 1p, 1nst)6x = 18p.
23 – 24 red – 1nst u svaki nst prethodnog reda = 18p. Napunite telo.
25. red – (preskočiti 1p, 1nst)6x = 12p.
26 – 27 red – 1nst u svaki nst prethodnog reda = 12p.
28. red – (preskočiti 1p, 1nst)6x = 8p.
Prekinuti nit, ali ostaviti dugačku nit za prišivanje glave. Dodajte još malo silikonske ispune u vrat, pa zatvorite otvor šivenjem iglom za vunu.
[:en]1. Body
Holding double strand of white yarn, begin with ch2. Leave a tail about 20 cm long for later.
Rnd 1 – In the 2nd st from the hook work 6sc. Continue working in spirals, rather than finishing each rnd with a sl.st. Place marker. Move the marker at the end of every round = 6sts.
Rnd 2 – (2sc in next st)6x. = 12 sts.
Rnd 3 – (1sc, 2sc in next st)6x = 18sts.
Rnd 4 – (2sc, 2sc in next st)6x = 24sts.
Rnd 5 – (3sc, 2sc in next st)6x = 30sts.
Rnd 6 – (4sc, 2sc in next st)6x = 36sts.
Rnd 7 – (5sc, 2sc in next st)6x = 42sts.
Rnds 8 – 12 – sc in every st = 42 sts.
Rnd 13 – (4sc, sk1, 1sc)6x = 36sts.
Rnds 14 – 15 – 1sc in each sc of the previous rnd = 36 sts.
Rnd 16 – (3sc, sk1, 1sc)6x = 30 sts.
Rnds 17 – 18 – 1sc in each sc of the previous rnd = 30 sts.
Rnd 19 – (2sc, sk1, 1sc)6x = 24 sts.
Rnds 20 – 21 – 1sc in each sc of the previous rnd = 24 sts. Pull the yarn tail from the starting chain to the outside of your work.
Rnd 22 – (1sc, sk1, 1sc)6x = 18 sts
Rnds 23 – 24 – 1sc in each sc of the previous rnd = 18 sts. Stuff the body.
Rnd 25 – (sk1, 1sc)6x = 12 sts.
Rnds 26 – 27 – 1sc in each sc of the previous rnd = 12 sts.
Rnd 28 – (sk1, 1sc)4x = 8 sts.
Break yarn, and leave a long tail for sewing the head onto the body. Stuff the neck a little bit more, then close the opening by sewing it using a tapestry needle.[:]

[:rs]2. Glava
Početi sa 2pl.
1.red – U drugu pl uraditi 6nst. Nastavite spiralno kukičanje, dakle bez mrtve p na kraju svakog reda. Postavite marker i pomerajte ga nagore nakon svakog urađenog reda. = 6p.
2.red – (2nst u sl.p)6x. = 12p.
3.red – (1nst, 2nst u sl.p)6x = 18p.
4.red – (2snst, 2nst u sl.p)6x = 24p.
5.red – (3nst, 2nst u sl.p)6x = 30p.
Od 6. do 11. reda – 1nst u svaku p prethodnog reda = 30p.
Od 12. reda početi oduzimanje.
12.red – (3nst, preskočiti 1p)6x = 24p.
13.red – (2nst, preskočiti 1p)6x = 18p.
14.red – (1nst, preskočiti 1p)6x = 12p. Napunite glavu.
15.red – Kao 14. red = 8p.
Prekinuti nit koja je ostavljena da bude duža, udenuti je u iglu i provući kroz svih 6 petlji, pa zategnuti da se otvor zatvori. Uvući višak niti u pletivo.
[:en]2. Head
Begin with ch 2.
Rnd 1 – In the 2nd st from the hook work 6sc. Continue working in spirals, rather than finishing each rnd with a sl.st. Place marker. Move the marker at the end of every round = 6sts.
Rnd 2 – (2sc in next st)6x. = 12 sts.
Rnd 3 – (1sc, 2sc in next st)6x = 18sts.
Rnd 4 – (2sc, 2sc in next st)6x = 24sts.
Rnd 5 – (3sc, 2sc in next st)6x = 30sts.
Rnds 6 to 11 – 1sc in each sc of the previous rnd = 30sts.
Rnd 12 – (3sc, 2sc tog)6x = 24sts.
Rnd 13 – (2sc, 2sc tog)6x = 18sts.
Rnd 14 – (1sc, 2sc tog)6x = 12sts. Stuff the head.
Rnd 15 – Like rnd 14 = 8sts.
Cut yarn leaving a long tail, thread the yarn needle with it and pull it through all 6sts one by one. Pull tight to close the opening. Weave in end.[:]

[:rs]3. Krila
Krila za svoje vile uradila sam prateći ovaj video, i to su krila koja možete videti na dve gornje fotografije. Međutim, nedavno sam osmislila svoju varijantu, sličnu prethodnoj, koju takođe ovde delim sa vama, a koja više odgovara mojim potrebama i ukusu. Na donjoj fotografiji možete videti moju izmenjenu varijantu krila za koja uputstvo možete pročitati u daljem tekstu.
Desno krilo
Jednom niti belog prediva uradite 2pl. (1pl na početku svih neparnih redova, kao i u redu 2 ne računa se kao petlja; takođe, mp na kraju redova ne računa se kao petlja.)
1. red – U 2.p od heklice uradite 4nst, okrenite. Sve redove radite sa okretanjem, a sve stubiće radite ubadanjem heklice u zadnji deo petlje.
2. red – 1pl, 2nst u svaku petlju = 8p
3. red – 1pl, 2nst, 2nst u sl.p, 5nst, 5pl = 14p
4. red – Mp u 2.p od heklice, 9nst, 2nst u sl.p, 2nst, mp u poslednju p drugog reda.
5. red – 1pl, 3nst, 2nst u sl.p, 7nst, 5pl = 17p
6. red – Mp u 2.p od heklice, 10nst, 2nst u sl.p, 4nst, mp u poslednju p četvrtog reda.
7. red – 1pl, 5nst, 2nst u sl.p, 8nst, 5pl = 20p
8. red – Mp u 2.p od heklice, 12nst, 2nst u sl.p, 3nst, mp u sl. p. = 17p
9. red – 1pl, 2nst, 2nst u sl.p, 11nst, 5pl = 21p
10. red – Mp u 2.p od heklice, 14nst, 2nst u sl.p, 3nst, mp u poslednju p osmog reda.
11. red – 1pl, 4nst, 2nst u sl.p, 11nst, 5pl = 22p
12. red – Mp u 2.p od heklice, 5nst, 5pl, mp u 2.p od heklice, 5nst, 4pl, mp u 2.p od heklice, 10nst, 2nst u sl.p, 3nst. NE OKREĆITE RAD. 10nst duž leve strane krila, mp u sl.p. Odsecite nit, ostavite duži kraj niti za prišivanje.
Levo krilo
Isheklati kao desno krilo.
Kraj niti sa jednog krila udenite u iglu za vunu i njime prišijte jedno krilo za drugo tako što ćete najpre krila poklopiti jedno preko drugog da se sve petlje slažu. Počevši od mesta gde izlazi ostavljeni kraj niti, šijte nagore ukupno 8 bodova. Uvucite višak prediva u pletivo.
Ostavljeni kraj niti prediva sa drugog krila iskoristite za prišivanje krila za telo lutkice. Pre nego što krila prišijete na telo, uštirkajte ih šećernim sirupom da bi ste ih učvrstili. U ovom članku pročitajte kako se pravi sirup za štirkanje u domaćoj radinosti i kako se njime štirkaju heklani predmeti. Kada budete potapali krila u štirak, vodite računa da ne potopite nit ostavljenu za prišivanje, jer ona mora ostati mekana.
Bonus savet – Ukoliko je Vaše zatezanje petlji dok heklate veoma čvrsto, krila možda nećete morati dodatno da učvršćujete. Ako, pak, heklate labavo i mekano, postupak štirkanja ne bi trebalo da preskočite.
[:en]3. Wings
For the wings of my fairy dolls I used a video tutorial that you can see on this link. Those wings are shown in the 2 upper photographs. However, I’ve recently made a little different variation of the wings which suits better to my taste and needs. The bottom photo shows my new, altered variation for doll wings, instructions for which you can read in further text.
Right Wing
Holding 1 strand of white yarn, start by doing ch2. (Ch1 at the beginning of odd rows and row 2 doesn’t count as a stitch; sl.st also doesn’t count as a stitch.)
Row 1 – In 2nd st from the hook 4sc, turn.
Row 2 – Work all sts in back loops only, in all rows; ch1, 2sc in each st = 8sts. Turn.
Row 3 – Ch1, 2sc, 2sc in next st, 5sc, ch5 = 14sts. Turn.
Row 4 – Sl.st in 2nd st, 9sc, 2sc in next st, 2sc, sl.st in the last st from row 2 = 13sts. Turn.
Row 5 – Ch1, 3sc, 2sc in next st, 7sc, ch5 = 17sts. Turn.
Row 6 – Sl.st in 2nd st,, 10sc, 2sc in next st, 4sc, sl.st in the last st from row 4 = 16sts. Turn.
Row 7 – Ch1, 5sc, 2sc in next st, 8sc, ch5 = 20sts. Turn.
Row 8 – Sl.st in 2nd st,, 12sc, 2sc in next st, skip1, 3sc, sl.st in the next st = 17sts.
Row 9 – Ch1, 3sc, 2sc in next st, 11sc, ch5 = 21sts. Turn.
Row 10 – Sl.st in 2nd st, 14sc, 2sc in next st, 3sc, sl.st in the last st from row 8 = 19sts.
Row 11 – Ch1, 4sc, 2sc in next st, 11sc, ch5 = 22sts. Turn.
Row 12 – Sl.st in 2nd st from hook, 5sc, ch5, sl.st in 2nd st from hook, 5sc, ch4, sl.st in 2nd st from hook , 10sc 2sc in next st, 3sc. DO NOT TURN. 10sc along the left side of the wing, sl.st in next st. Cut yarn, leave a long tail for sewing.
Left Wing
Like the right wing.
Use a yarn tail of one wing to sew the wings to each other. Line up the central parts of the wings together and sew them with 8 sts using a yarn needle, and starting from the point where the tail is. Weave in end.
Use the other tail end to sew the wings later to the body. Before you sew the wings onto the body of the doll, starch them with sugar syrup to make them firm. Read this article about how to make the sugar syrup and how to starch the wings. When dipping the wings in the starch syrup, make sure you DON’T starch/dip the yarn tail which was left for sewing. It needs to stay soft for sewing the wings to the body.
Extra Tip – If your crocheting tension is strong, you may not need to starch the wings. However, if you crochet rather loosely, then starching step shouldn’t be omitted.
[:]


[:rs]4. Kruna
Kruna se može isheklati na puno načina, a ja sam radila 2 različite varijante – kod prve varijante kruna ima 8 špiceva i svi su jednake visine; druga varijanta ima špiceve samo spreda – 2 manja i 1 veći u sredini – pa je prednja strana viša od ostatka krune.
Varijanta 1
Držeći 1 nit belog i 2 niti zlatnog prediva, počnite lančićem od 40p. Zatvorite krug mrtvom petljom i heklajte ukrug:
1. red – 1pl (ne računa sa kao p), 1nst u ist p kao i pl, 39 nst, mp u prvi nst.
2. red – ubadajte heklicom samo u zadnji beočug p: 1pl, 1nst, 1p preskočiti, *u sl. p(3nst, 3pl, 3nst), 1p preskočiti, 2nst, 1p preskočiti*. Ponavljati od * do * do kraja reda. Završiti mp u sl.p. Odseći nit, uvući u pletivo.
Varijanta 2
Držeći 1 nit belog i 2 niti zlatnog prediva, počnite lančićem od 39p. Zatvorite krug mrtvom petljom i heklajte ukrug:
1. red – 39nst.
2. red – Ubadajte heklicom samo u zadnji beočug petlji. (3nst, piko)4x, 3pvs, piko, 3vst, piko; u sl. centralnu p radite(3dvs, piko, 3dvs); zatim nastavite: piko, 3vst, piko, 3pvs, piko, (3nst, piko)4x. Mrtvom p u sl. p završite ovaj red. Prekinite nit, uvucite višak niti u pletivo.
Poštirkajte krunu šećernim sirupom da bi kruna bila čvrsta. Kako se pravi šećerni sirup i kakav je postupak štirkanja, pročitajte u ovom članku.
[:en]4. Crown
The crown can be made in many different ways, and I have designed 2 variations: the first one has 8 spikes of the same height, while the second variation has 3 spikes, 2 small ones and one big in the middle, so the front side is taller than the rest of the crown.
Variation 1
Holding 1 strand of white and 2 strands of golden yarn begin by chaining 40 and join 1st and last sts with a sl.st to form a ring. Crochet in the rounds.
Rnd 1 – Ch1 (doesn’t count as a st), sc in the same st as ch1, 39 sc; sl.st in 1st sc.
Rnd 2 – insert the hook in the back loops only: ch1, 1sc, skip1, *in next st(3sc, ch3, 3sc), skip1, 2sc, sk1*. Repeat from * to * to the end of rnd. Finish with a sl.st in next st. Break yarn, weave in end.
Variation 2
Holding 1 strand of white and 2 strands of golden yarn begin by chaining 39 and join 1st and last sts with a sl.st to form a ring. Crochet in the rounds.
Rnd 1 – 39 sc.
Rnd 2 – Insert the hook in back loops only. (3sc, picot)4x, 3hdc, picot, 3dc, picot; in the next, central stitch work(3tr, picot, 3tr); then continue: picot, 3dc, picot, 3hdc, picot, (3sc, picot)4x. Sl.st. in the next st. Cut off yarn, weave in end.
Starch the crown with sugar syrup to make it stiff and firm. How to make the sugar syrup and how to starch crocheted items, please, read this article.[:]


[:rs]5. Venčić
Ova lutkica-vila ima venčić koji je dobila od Šumske vile. Uz pomoć njega, krune i čarobnog štapića vila može da stvara čaroliju.
Venčić napravite uplitanjem 6 niti belog prediva dužine oko 30 cm. Za svaku trećinu pletenice držite po 2 niti prediva. Krajeve pletenice vežite providnom gumicom. Odsecite višak prediva.
[:en]5. Wreath
This fairy doll has a wreath which she got from the Forest Fairy. With the help of the wreath, crown and magic wand she can make magic.
Make the wreath by braiding 6 pieces of white yarn, about 35 cm long. Hold 2 strands of yarn for each part of the simple braid. Tie the ends with transparent rubber band. Trim the excess yarn.[:]

[:rs]6. Kosa
Pravljenje kose je jedan od najvažnijih elemenata kod izrade lutaka, jer kosa i lice daju lepotu i čar svakoj lutkici. Međutim, izrada kose oduzima najviše vremena, a zahteva veštinu i strpljenje. Ima mnogo različitih postupaka za izradu kose na lutkici, a ja ću sa vama ovde podeliti jedan od najjednostavnijih i najpreciznijih metoda koji koristim za ravnu kosu svojih heklanih i šivenih lutkica.
[:en]6. Hair
Making the hair is one of the most important elements of a doll, since the hair and face are the ones that give the doll its beauty and charm. However, this step takes up the most time and it requires skill and patience. There are many different ways for creating a doll’s hair, and here I’ll share one of the easiest and most accurate methods which I have been using for flat hair of my crocheted and sewn dolls.[:]

[:rs]7. Lice
Silfida je vila koja ume da sluša, pa sam odlučila da ima samo oči i nos. Ako više volite da ima i usta, slobodno ih dodajte.
Oči sam vezla crnom vunicom sa nekoliko uspravnih bodova. Bodovi se protežu u visini od 3 reda, a iglom sam ubadala u 1 te istu p i gore i dole.
Nosić je urađen sa 3-4 boda horizontalno, a razmak je takođe 3 petlje u širinu. Zatim sam uradila 5-6 vertikalnih bodova duž celog nosa. Zahvatala sam samo već urađene horizontalne niti nosa, nisam ubadala iglom u petlje glave.
Ukoliko želite da izvezete i usta, uradite ih na isti način kao nos, ali bez vertikalnih bodova.
Pogledajte moj video na youtube za detaljnu izradu lica – oči, nos i usta. Video je idealan za početnike.
[:en]7. Face
Sylphide fairy is a good listener. That’s why I decided to give her only the nose and eyes. But if you prefer your doll to have a mouth as well, feel free to add one.
I embroidered her eyes using black yarn and just a few vertical stitches. The stitches stretch to about 3 rows in height, and I inserted the needle in one stitch on top and on on the bottom.
The nose was made with 3-4 horizontal sts, and the width is 3sts. Then I did 5-6 vertical stitches around the whole nose. I inserted the needle only around the horizontal sts, not in the sts of the head.
You can make the mouth in the same way as the nose but doing only the horizontal sts. Watch my video on youtube on how to embroider eys, nose and lips.
[:]

[:rs]8. Ruke
Da biste napravili jednostavne ruke, odsecite 18 niti belog prediva dužine oko 20 cm. Provucite sve niti kroz telo lutke gde bi trebalo da budu postavljene, tako da snop niti izlazi i sa leve i sa desne strane tela. Poravnajte niti da budu iste dužine sa obe strane tela. Zatim ispletite klasičnu pletenicu od niti sa leve strane. Kada ostane oko 2-3 cm do kraja, niti uvežite providnom gumicom. Ponovite postupak i sa desnom rukom.
[:en]8. Arms
To make these simple arms, cut 18 pieces of yarn 20 cm long. Pull them all through the dolls body where the arms are supposed to be so that all the pieces of yarn stick out on the left and right sides of the body. Make sure the yarn pieces are all lined up and even on both sides. Then make a simple braid for each arm, secure it with a transparent rubber band and trim the excess yarn to form small hands.[:]

[:rs]9. Kragnica
Za kragnicu ubodite heklicom u bilo koju petlju na vratu lutke i učvrstite zlano predivo jednom pl. Dalje radite po 3nst u svaku p do kraja reda. Pošto ste lutku heklali spiralno, kraj reda neće biti isti red kao i početak, već će biti 1 red niže ili više (zavisno od toga da li ste kragnicu heklali odozgo nadole ili odozdo nagore). Da biste izravnali ovaj red, poslednja 3nst uradite u istom redu gde ste počeli kragnu. Završite mp u prvi nst.
[:en]9. Collar
Make the collar by inserting the hook anywhere at the doll’s neck and ch1 with golden yarn. Next, do 3sc in each st around till you get to the end of the round. Now since you made the body spirally, your end of round will be a row higher/lower (depending of the crocheting direction, i.e. whether you crocheted the collar top to bottom or bottom to top) than the beginning of round. Therefore, even your work by doing the last 3sc in the round where you started the collar. Finish with sl.st in the 1st sc.[:]
[:rs]10. Rub haljinice
Zlatno predivo učvrstite u bilo kojoj p na dnu dela lutkice i rub haljine uradite isto kao i kragnicu.
[:en]10. Dress Hem
Attach golden yarn anywhere at the bottom of the doll’s body and make the hem in the same way as the collar. [:]
[:rs]11. Čarobni štapić
Za čarobni štapić najpre napravite šablon. Odštampajte crtež zvezde dat u ovom koraku i isecite zvezdu najpre po spoljnim ivicama. Zatim isecite i unutrašnju malu zvezdu prateći konture sa crteža.
Ovako dobijeni šablon položite na crveni samolepljivi svetlucavi karton i iscrtajte samo spoljašnje konture veće zvezde. Jednu isečenu zvezdu nalepite na gornju stranu štapića. Isto uradite i sa drugom zvezdom, pa zalepite jednu na drugu tako da vrh štapića bude između njih.
Zatim šablon položite na roze samolepljivi svetlucavi karton i iscrtajte 2 male zvezde prateći samo unutrašnje konture zvezdice. Male roze zvezde nalepite na sredinu svake crvene strane zvezde.
Vežite mašnu na štapić ispod zvezde.
[:en]11. Magic Wand
For the magic wand, first make a pattern. Print out the star outline drawing given in this step, and cut it along the outer lines. Then cut the inner lines of the small star.
Lay this pattern onto the back side of the red shimmering cardboard and draw the outer lines of the big star. Repeat once again to have 2 big stars. Stick one star onto one side of the wooden stick stick, making sure the stick is in the middle of the star. Stick the other star to the stick and at the same time to the first star. Press all sides and corners with your fingers.
Next, lay the star pattern onto the pink shimmering cardboard and draw the inner lines of the small star 2 times to have 2 little stars.
Paste each small star onto each big star and press with your fingers. Make sure the small pink stars are in the center of the big red stars.
Tie a decorative ribbon around the stick below the star.[:]


[:rs]12. Završna obrada
[:en]12. Finishing
To make the doll stand stable, on the bottom of the doll’s body, where you left a 20 cm long tail, thread the yarn needle with that tail and insert the needle through the center. Pull out the needle and yarn somewhere at the arm, pull tug so that the bottom of the doll is pulled towards inside. Tie 2 knots and hide the yarn in the doll’s body. This way the doll will stand straight and stable.
[:]

[:rs]Donirajte ukoliko ste u mogućnosti[:en]Donate If You Can[:]
[:rs]Ukoliko su Vam moje ideje i projekti doneli inspiraciju i uživanje, donirajte koliko ste u mogućnosti. Svaka podrška malim, starim zanatima isplatiće se višestruko. I najmanji iznos može mnogo da pomogne.
Hvala što ste deo umetnosti i lepote ručnog rada!
[:en]If my handmade items and designs have brought you inspiration and joy, consider making a small donation to support my work. Your generosity helps me continue crafting beauty, one stitch at a time. Even the smallest amount can go a long way.
Thank you for being a part of art and beauty in handicraft.[:]
[:rs]
- Da li želite više inspiracije za heklanje? Zapratite me na Pinterest-u i pronađite još sjajnih ideja!
- Budite u toku sa najnovijim projektima ručnog rada. Posetite moj Instagram profil!
[:en]
[:rs]Kolekcija Lutkica[:en]Doll Collection[:]
[:rs]Set koji se sastoji od heklane ili šivene lutkice i knjige-bajke, predstavlja jedinstven poklon za specijalne prilike za Vaše mališane, ili za odrasle koji vole dekor lutke[:en]A set consisting of a crocheted or sewn doll and a story book, represents a unique special occasion gift for your children or for adults who like decor dolls[:]