
[:rs]Polukružna suknja na preklop sa volanom [:en]Half-Circle Wrap Skirt With A Ruffle[:]
[:en]Irresistible 3 in 1 garmet[:rs]Neodoljiv 3 u 1 komad[:]
[:en]Let me show you how to construct, draw a pattern, and sew a wrap skirt with a ruffle exactly by your measurements.[:]
[:rs]Multipraktičnost
Ovaj komad je zapravo 3 u 1: suknja – ogrtač – haljina.
Suknja na preklop ima dugačke trake za vezivanje, pa je možete vezati na nekoliko načina: spreda, sa strane, ili pozadi. Preklop stavite na levi ili na desni bok po želji.
Obim suknje dovoljno je širok, pa ukoliko je vežete iznad grudi, suknja se može pretvoriti u haljinu za plažu bez bretela. Vežite je takođe kako god želite – ispod grudi, oko vrata, oko struka. Uvek ćete izgledati drugačije.
I konačno, ako ovaj model prebacite preko ramena, dobijate ogrtač bez rukava sa mašnom oko vrata, ili vezanom oko struka, ali i kao kimono sa rukavima.
Pogledajte i video ispod koji prikazuje nekoliko načina nošenja ovog modela.
[:en]Multi-Functionality
This garment is actually 3 in 1: skirt – dress – wrap.
First of all, the wrap skirt has long straps, so you can tie them in several ways: at the front, side, or back. Place the wrap on your left or right hip, as you desire.
Secondly, the skirt waist is wide enough so if you tie it above the bust area, you’ll turn into a strapless beach dress. Tie it also as you wish – around your neck, below your breasts, around the waist. You’ll always look different.
Finally, if you toss this piece over your shoulders, you’ll get a sleeveless wrap with a bow tied around your neck or around the waist, but it can also be a kimono wrap with sleeves.
Check out the video below, showing different ways of wearing this wrap skirt that you can sew in no time.[:]
[:rs]Suknje na preklop imaju mnogobrojne prednosti:
- Odgovaraju različitim dimenzijama struka
- Mogu se podesiti da se vezuju spreda, pozadi, ili sa strane
- Preklop može biti sa leve ili desne strane
- Kada je oblik suknje asimetričan, kao što je to slučaj sa ovim modelom, kraći i duži deo možete okrenuti napred, na bok, ili kako god želite u datom raspoloženju.
- Sve u svemu, ako Vam kilaža varira kao meni, suknje na vezivanje su najbolje rešenje za promenljivi obim struka
[:en]Wrap skirts have so many advantages:
- They fit different waist measurements
- They can be tied at the front, at the back, or at the side
- The overlapping may be on the left or right side, and when the garment is asymmetrical, like this one, the shorter or longer side can be placed at your knees, your hip, or anywhere you feel like depending on your current mood.
- All in all, if your weight varies like mine, wrap skirts are the ultimate solution for a constantly oscillating waist[:]
[:rs]nivo [:en]level [:]
[:rs]Početni nivo. Da biste sašili ovakvu suknju potrebno je da imate osnovno znanje u šivenju korišćenju kućne šivaće mašine. Krojenje suknje krajnje je jednostavno i pogodno za početnike.
[:en]Basic level. To make this skirt you will need basic knowledge in sewing and using your home sewing machine. Drafting/tailoring the skirt is very easy and suitable for beginners.[:]
[:rs]materijal [:en]material [:]
- [:rs]Oko 2,5m tankog pamučnog materijala širine 140cm.
- Mašinski konac u odgovarajućoj boji
- Lepljivo platno za ojačavanje pojasa
- Makaze
- Šestar, lenjir i olovka
- Papir za krojenje
- Šivaća mašina
- Špenadle
[:en]
- About 2.5m / 2.5yd of thin cotton fabric, 1.5yd in width
- Machine thread in the matching color
- Fusible interfacing for firming the waistband
- Scissors
- Ruler, pencil and a pair of compasses
- Tracing paper
- Sewing machine
- Pins
[:]
[:rs]veličina [:en]size [:]
[:rs]Univerzalna veličina
Kroj se može podesiti za sve veličine
[:en]All sizes
The pattern can be adjusted to any size
[:]
[:rs]uputstvo [:en]instructions [:]
[:rs]Uvod
Ovaj tutorijal posvećen je konstrukciji i šivenju suknje na preklop sa volanom. Krojni plan prikazuje 1/2 suknje i 1/2 volana koji se kroje na pregibu tkanine.
Kroj se može prilagoditi bilo kojoj veličini, a uputstvo daje detaljno objašnjenje za konstruisanje suknje prema Vašim merama.
Dodaci za šavove
1,5cm dodatka za sve šavove suknje i volana.
1cm dodatka za šavove za pojas.
[:en]Introduction
This tutorial teaches you how to construct and sew a wrap skirt with a ruffle. The pattern shows 1/2 of the skirt and 1/2 of the ruffle, both of which are cut on fold.
The pattern is suitable for any size, and the instructions are a detailed guide for drafting the skirt in your size.
Seam Allowances
1.5cm / 0.5in for all seam allowances.
1cm / 0.4in for waistband.
[:]
[:rs] 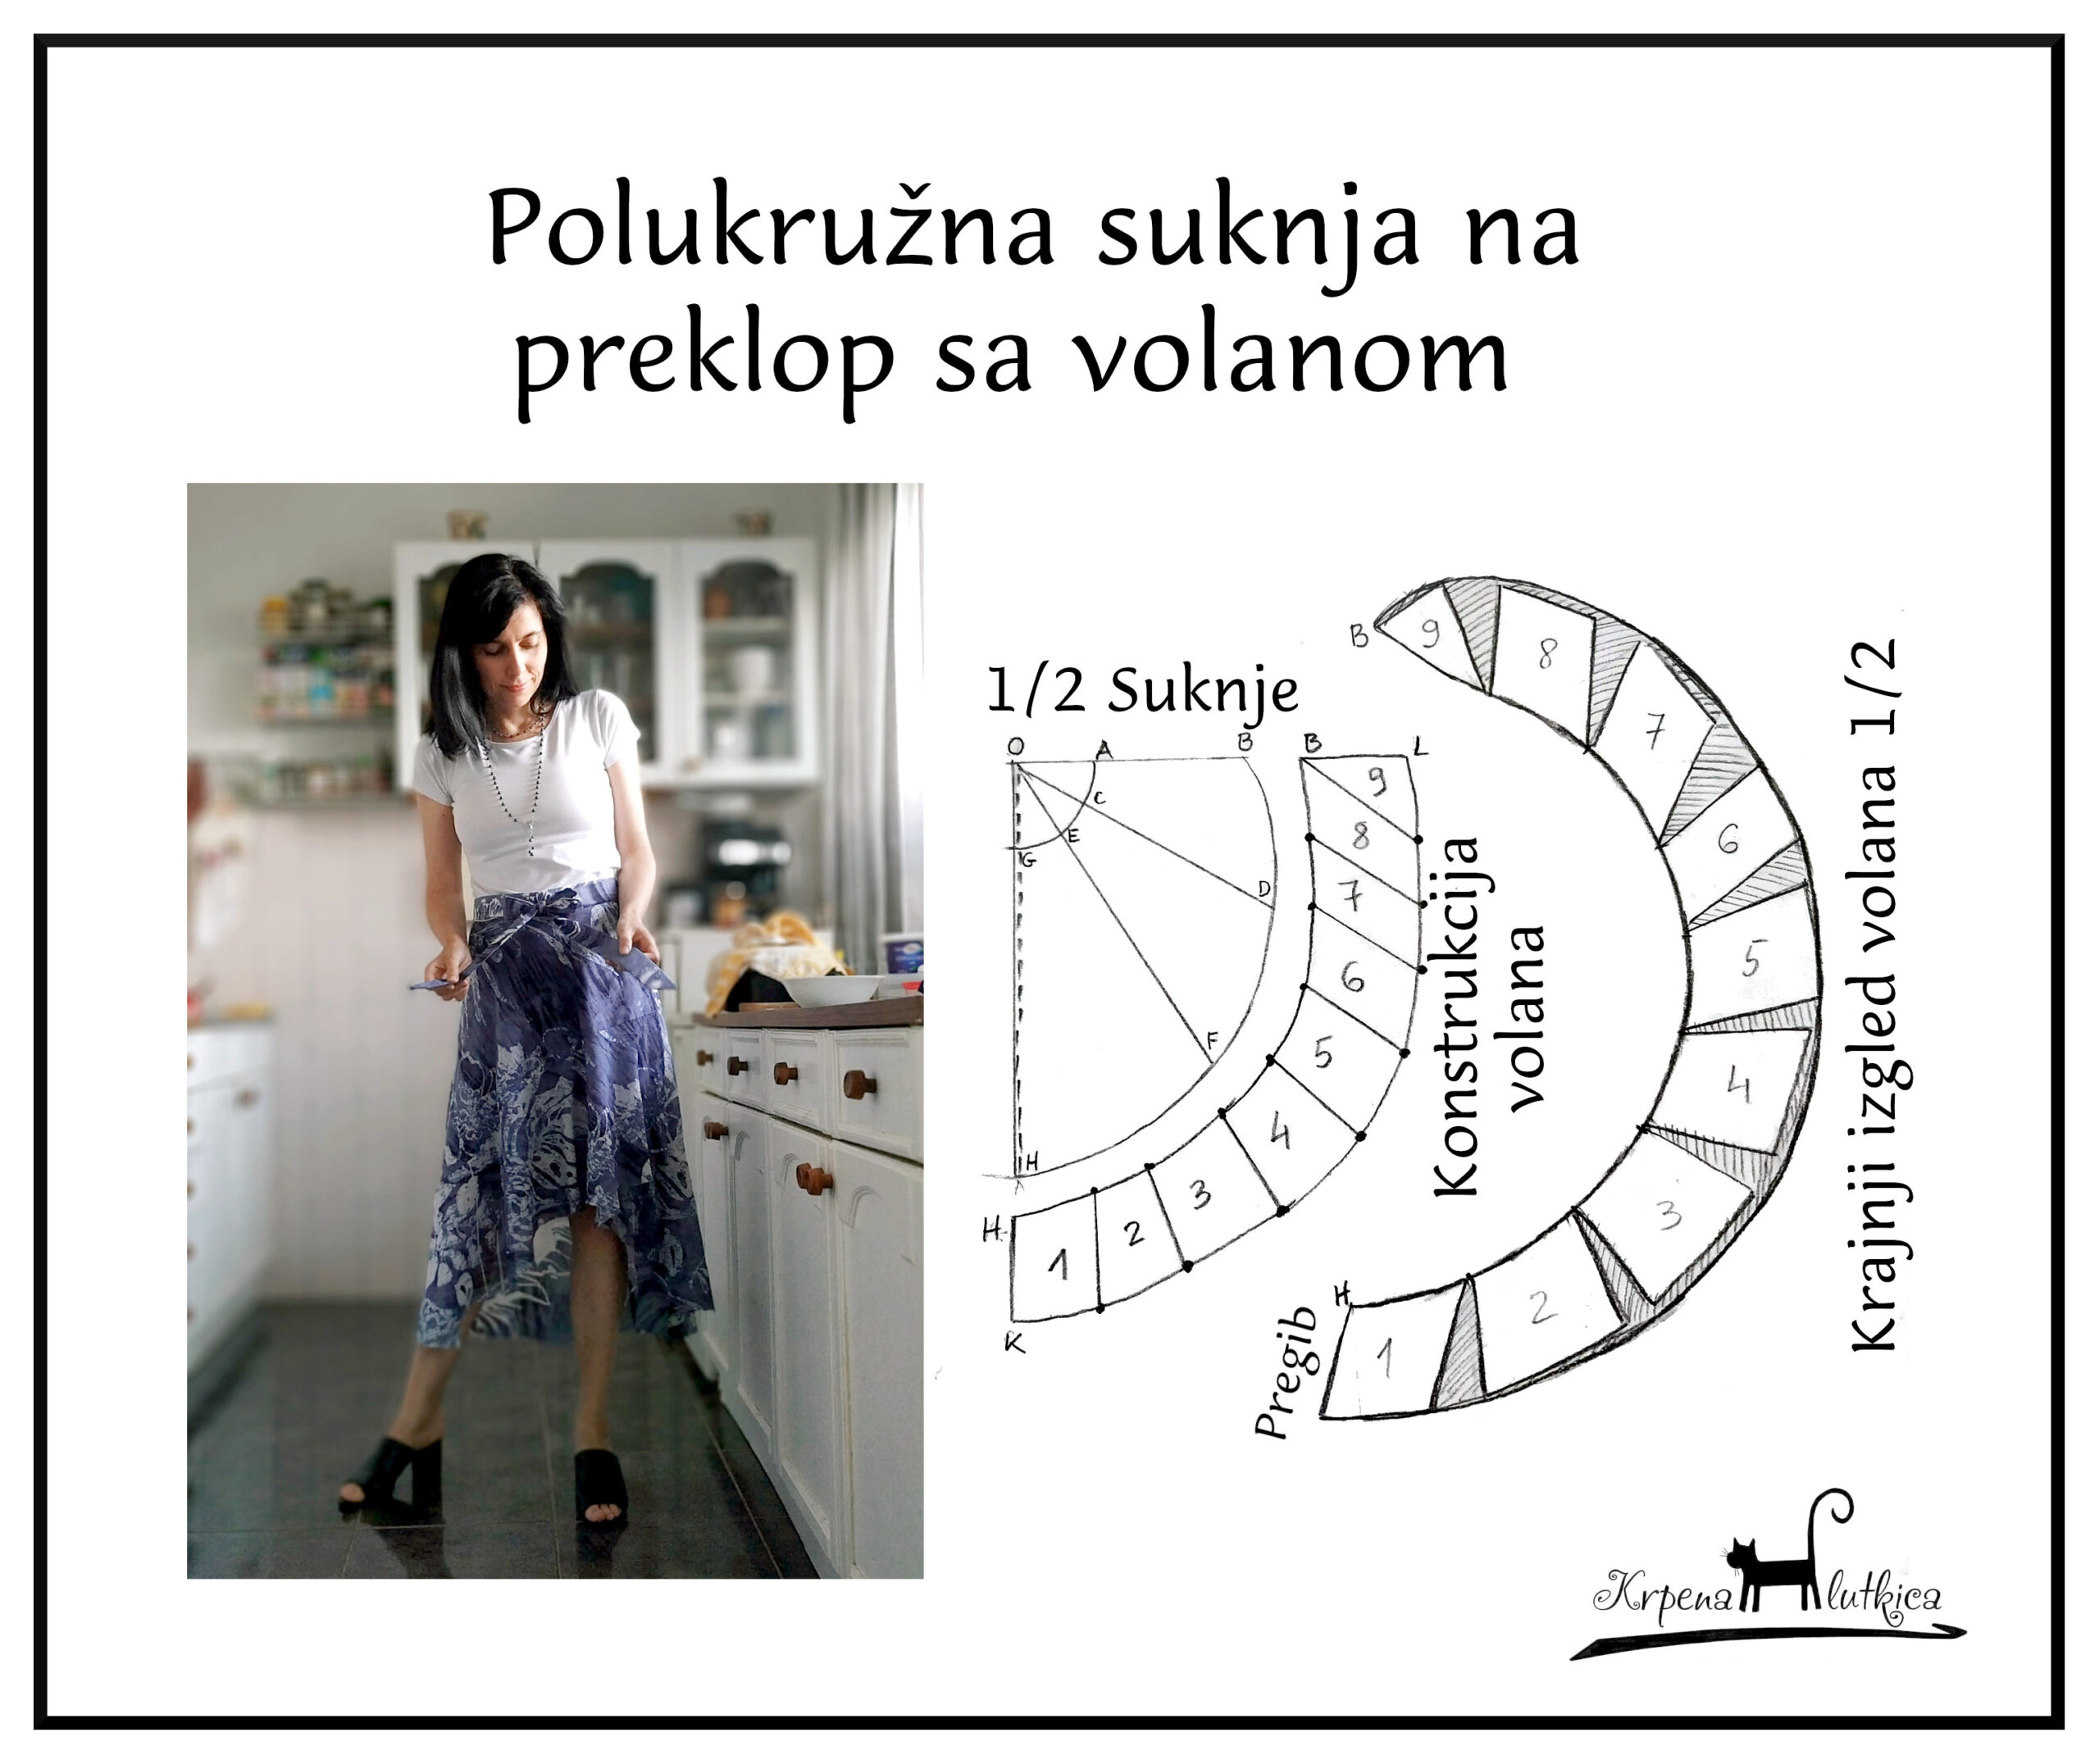
[:en]
[:]
[:rs]Konstrukcija Suknje
Pratite crtež gore (dijagram) i video niže, i na pairu za krojenje napravite šnit prema svojim dimenzijama.
Nacrtajte prav ugao. Dužina OA = OG. Izračunajte ovu dužinu na sledeći način: Obim struka x 1,4 = Ob.Suk. (obim suknje). Ovo je suknja na preklop i zbog toga mora imati veću širinu od obima struka.
OA (OG) = Ob.Suk. x 2 / 6.28
Na krojnom papiru odmerite dužine OA i OG i obeležite tačke A i G. Iz tačke O šestarom nacrtajte 1/4 kruga idući od tačke A do tačke G.
AB = dužina od struka do trećine butine.
GH = dužina do kolena
Krivu AG izmerite krojačkim metrom i podelite je na 3 jednaka dela. Obeležite tačke E i C.
Dužinu EF i CD odredite na sledeći način:
EF = GH / 1,2
CD = AB x 1,2
Konstrukcija Volana
Kriva HB na volanu identična je krivoj HB na suknji. Stranice HK i BL su pod uglom od 90 stepeni jedna u odnosu na drugu. HK = BL = 23 cm.
Krivu KL nacrtajte tako da pude paralelna sa krivom HB, odnosno da ceo volan bude širine 23cm.
Krivu HB ste već izmerili, pa tu veličinu podelite na 8 jednakih delova i obeležite sve tačke. Krivu KL takođe izmerite, pa nju izdelite na 9 jednakih delova i obeležite sve tačke. Povežite tačke na krivoj HB sa njihovim odgovarajućim tačkama na krivoj KL kao što prikazuje crtež.
Tako dobijeni volan izrežite po spoljnim ivicama, a zatim svaku od 8 linija unutar volana rasecite makazama počevši od donje ivice na gore, ali secite samo do 2-3mm od gornje ivice. Sada volan položite na novi list papira za krojenje, razmaknite svaki deo za po 5cm, pričvrstite selotejpom i nacrtajte novodobijeni volan na novi krojni tabak. Slobodnom rukom zaoblite donju ivicu volana. Isecite gotov novi volan.
Konstrukcija Pojasa
Pojas sa trakama za vezivanje krojiti kao 2 pravougaonika širine 10cm i dužine 140cm. Gotova širina pojasa biće 4cm, dužina oko 280cm. Pre šivenja pojasa, presavijte ga na pola duž njegove duže ivice.
[:en]Skirt Construction
Following the drawing above, as well as the video that you will find below, let’s construct the pattern according to your measurements.
Draw a right angle. Length OA = OG. Calculate this length like this: Waist circumference x 1.4 = W.M. (waist measure). Being a wrap skirt, this garment’s waist must be larger than your actual waist to wrap around your body.
OA (OG) = W.M. x 2 / 6.28
On tracing paper measure this length and mark dots A and G. Using a pair of compasses, from dot O draw 1/4 of a circle from dot A to G.
AB = length from waist to 1/3 of your thigh
GH = from waist to knee
Measure curve AG using your measuring tape and divide it in 3. Mark dots C and E.
Calculate lines EF and CD like this:
EF = GH / 1.2
CD = AB x 1.2
Constructing The Ruffle
Curve HB of the ruffle is identical to curve HB of the skirt. Sides HK and BL are at 90 degrees one to the other. HK = BL = 23cm / 9in.
Draw curve KL so that it’s parallel to curve HB, i.e. make the whole ruffle 23cm / 9in wide.
You have already measured curve HB, so now divide it in 8, and mark all 8 dots. Measure curve KL and divide it in 9, mark all the dots. Connect the dots on curves HB with their corresponding dots of curve KL like shown in the diagram.
Cut the ruffle along its outer edges. Next, cut each of the 8 inner lines starting from curve KL, but make sure not to cut to the end; leave about 2-3mm / 0.1in uncut. Then lay the ruffle on a new sheet of tracing paper, spread the cut pieces 5cm / 2in apart, secure with some masking tape (or selotape) and draw a new ruffle. Curve the bottom edge of the ruffle freehand. Cut the new finished ruffle.
Constructing The Waistband
The waistband with tying ribbons are 2 rectangles 10cm / 3.9in by 140cm / 55in. The finished waistband will be 4cm / 1.5in wide. Before sewing the waistband, fold it in half along its longer side.[:]
[:rs]Krojenje na tkanini[:en]Cutting The Fabric[:]
[:rs]Suknju krojiti na pregibu tkanine. duž ivice GH. Volan takođe krojiti na pregibu tkanine duž ivice HK. Ukoliko nemate dovoljnu količinu materijala za volan, presecite papirni kroj volana na pola i delove volana iskrojte posebno. Takođe, ako ne možete uklopiti volan da se iskroji na pregibu tkanine, položite ga u bilo kom smeru i iskrojte ga sa šavom na sredini umesto sa pregibom. Moj volan je iskrojen iz 4 dela, jer sam ovaj materijal kupila u parčićima kao ostatak sa trube, tako da na sredini pozadi volan ima šav. Kod dezeniranih materijala sa nepravilnim šarama, ovo presecanje kroja neće biti uočljivo. Pojas krojte poprečno na tkanini iz 2 dela koja će imati šav na sredini pozadi.
[:en]The skirt is to be cut on fold along its GH side. The ruffle should also be cut on fold along the edge HK. If you don’t have enough fabric for the ruffle, cut the paper pattern in half, lay the 2 pieces on fabric and cut them separately. Also, in case you can’t fit the ruffle to be cut on fold, lay it in any direction on the fabric and cut it with a seam at the center back. With colorful materials, especially if they have randomly positioned ornaments/motifs, cutting the ruffle pattern won’t be visible. My ruffle is made up of 4 pieces with a seam at center back because I bought the material in leftover pieces.[:]
[:rs]Šivenje[:en]Sewing[:]
[:rs]Špenadlama, licem na lice, prikačite gornju ivicu volana HB na donju ivicu suknje HB i proštepajte. Obradite šav cikcak bodom i prepeglajte. Ukoliko šijete suknju od tkanine koja se providi, možete deo suknje iskrojiti 2x. U tom slučaju prišpendlajte 3 sloja tkanine kao sendvič: između dva krojna dela suknje položite volan. Dva dela suknje treba da leže licem na lice.
Obe ivice suknje ABL podvrnite uzano na unutra 2x, prepeglajte i proštepajte.
Cikcak bodom obradite donju ivicu volana. Time ćete dobiti finu talasastu ivicu suknje.
2 kraće strane pojasa položite licem na lice i proštepajte. Ovo će biti šav na sredini pozadi. Prepeglajte šav. Na pojas nalepite lepljivo platno, zatim pojas presavijte na pola duž njegove duže strane, i prepeglajte.
Licem na lice prikačite pojas za gornju ivicu suknje tako da središnji šav leži tačno na sredini suknje. Proštepajte.
Licem na lice proštepajte trake koje su u produžetku pojasa do početka suknje. Prevrnite trake na lice, prepeglajte, podvrnite nesašivenu ivicu na unutra i prepeglajte je tako da neleže na šav. Šav prepeglajte na gore kako bi ušao u pojas. Na kraju s lica zaštepajte i unutrašnju stranu pojasa za suknju. Ceo pojas sa trakama ispeglajte.
Isprobajte ogrtač – suknju – haljinu na nekoliko različitih načina.
[:en]With right sides facing pin down the upper side of the ruffle to the lower side of the skirt – side HB onto HB. Stitch, work the zig-zag on the seam allowance and press. If you are making a skirt from a see-through material, you can cut another piece of the skirt pattern. In that case pin down the 3 layers like a snadwich: lay the ruffle between 2 skirt pieces. The 2 skirt pieces should lay face to face.
Fold both edges of the skirt ABL to the inside twice, press, and stitch down.
Use a zigzag stitch to work on the lower edge of the ruffle. This will give you a nice, wavy hem.
Pin down the 2 short sides of the waistband and stitch them together with right sides inside. This will be zour center back seam. Press the seam. Apply fusible interfacing on the wrong side of the waistband. Fold the waistband in half along its longer side and press.
With right sides facing, pin down one side of the waistband to the upper side of the skirt, making sure the center seam is on the center back of the skirt. Stitch down.
With right sides facing stitch down the ribbons which are the extensions of the waistband. Turn them right side out and press. Also press the seam allowance of the waistband upwards so it goes inside the waistband. Press the unsewn seam allowance inside and then stitch it down to the skirt from the right side. Press the whole waistband with the ribbons.
Wear the wrap – skirt – dress in many different ways.[:]
[:rs]Povezane objave [:en]Similar posts [:]
[:rs]
- Da li želite više inspiracije za heklanje? Zapratite me na Pinterest-u i pronađite još sjajnih ideja!
- Budite u toku sa najnovijim projektima ručnog rada. Posetite moj Instagram profil!
[:en]