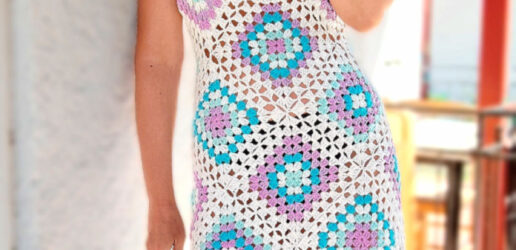
Eleni - granny square crochet dress
Crochet Dress in Pastel Tones to Spice Up Your Summer
This post is dedicated to simple crochet instructions on how to make this beautiful airy summer dress composed only from granny square motifs.
Additionally, my video tutorial that you will find below, teaches you a great technique on how to change yarn color in each square without weaving in.
Ancient Greece Behind the Dress Name
I decided to name this dress Eleni after this beautiful country where I spend most of my summer holidays. Eleni is a traditional Greek name which has a strong association with light, sun and glow. My name being Jelena, which is a Serbian variation of the Greek Eleni and international names Helen or Elen(a), beautifully, and intentionally, matches my choice of naming this dress.
In Greek mythology and culture, the name is most famously associated with Helen of Troy, described by Homer as the most beautiful woman in the world whose abduction sparked the Trojan War.
The name also holds significant Christian heritage through Saint Helen, the mother of Emperor Constantine I, who is admired for her piety and for discovering the True Cross.
Our Serbian Orthodox Church celebrates the day of St. Constantine and Helen on 16th June, as one of the most important holy days.
Another interesting fact I found online is that in the Greek Orthodox tradition, the name day for Eleni is May 21st, coinciding with the feast of Saint Helen, another very important religious holiday.
Having said all this, I’d say May is the perfect month for publishing a post and pattern like this.
Granny Square Dress That Will Turn Heads
I know I’ve repeated this sentence many times, but this dress drew so much attention on my last holiday, that I actually caught a woman on the beach taking a photo of me wearing it. I smiled, of course, and you can imagine how proud I was.
So, if you like to be spotted and admired for either your looks or skills, or both, this is the project for you!
Inspiration
Below you can see the original design that sparked my creative moment and led to making this granny square dress.
As always, I made some tiny changes to the original model, but overall I kept the silhouette and the shape of the dress almost identical to the ones I found on Pinterest.
A Project for Patchwork Lovers
This dress originally consists of 59 granny square motifs. However, I made mine with 38 motifs, mainly because I was in a hurry to finish it to show it off 🙂 but also because I wanted to have a slightly shorter version, perfect for the beach holiday.
The dress is worked by joining each square motif to the rest of the fabric where the front and back are assembled as you go. Each granny square has 7 rounds and the join is done in the 7th round.
After all motifs have been assembled, you crochet a long cord which is used for keeping the dress in place, and which goes around the neck and back, as a kind of strap.
Photos taken from Pinterest
Instructions
I haven’t written a detailed pattern for the Eleni dress simply because this isn’t my original design and I don’t take credit for it. Nevertheless, I do offer basic instructions for crocheting and assembling the motifs into a full piece in further text, and, as I already said, a video tutorial on how to change yarn color without weaving in.


level
To make the Eleni Granny Square Dress you will need intermediate level of crocheting skills. Stitches used in this pattern are:
- chain
- single crochet
- double crochet
size
S, M, L, XL
This is my approximate estimate. I made the dress for my own personal use, not for sale, so I didn’t go into detailed calculations for different sizes.
Crocheted garments, especially those made with cotton yarn, tend to stretch significantly when worn. Because of that, one size can fit women with different body shapes and sizes.
material
Yarn
- For this project I used sport yarn Vera Yumco in white and 2 shades of lavender, as well as some blend yarn (of similar weight) in blue and turquoise, suitable for 3 – 3.5 mm hook.
For smaller sizes (XS and S), I suggest using slightly thinner yarn than the one recommended, along with a 2.5 mm or 3 mm hook.
For larger sizes, you can add one more round to each square while using the same yarn and hook size mentioned above.
Amount
For my size (M) I used up about 550 gr of yarn.
Needles, Hooks & Other Supplies
- 3.5 mm hook
- Yarn needle for weaving in ends
📖 Instructions
To crochet the dress Eleni, start by doing the first granny square motif. Follow the Granny square motif chart given below.

Every next motif will be joined in the last, 7th round, as you go. See the Joining round granny square chart below and written instructions given after the chart.

The red stitches show the working motif in its 7th round where you start the join, while the stitches in black represent one finished motif.
When you get to the 1st or 2nd corner in rnd 7, start joining the working motif to the finished motif(s) like this (making sure you hold the two motifs with their wrong sides facing each other):
3dc in corner, ch1, pull hook through corner ch-sp of the finished motif (whenever you pull hook through the ch-sp of the finished motif, yarn must be behind it), ch1, 3dc in the same corner of the working motif, [ch1, pull hook through next ch-sp of the finished motif, ch1, 3dc between the 2 groups of 3dc of the working motif]repeat to the next corner; in next corner: (3dc, ch1, pull hook through corner ch-sp of the finished motif, ch1, 3dc in the same corner of the working motif.
In cases when you need to join one motif with 2 other motifs, just continue joining the working motif along its next side with the needed side of another finished motif. Follow the same directions described above.
In corners where 2 motifs meet, join the next motif by doing ch1, insert hook in the stitch where 2 finished motifs were joined in a corner, and then do another ch1.
BONUS Video Tutorial — How to Change Color in Granny Square
In the video tutorial below you can learn a great technique on how to change color when working a granny square in multiple colors.
When you frequently change yarn color after each round (or row), there are so many yarn ends you need to hide. To avoid that I’ve come up with a better solution without endless weaving in. I hope this tutorial helps you in your future projects as much as it helped me with this dress and many other works.
Note: You may notice a small difference between my written instructions above and the video tutorial below — for which I apologize.
- For the granny squares used in the dress, I worked 2 chain stitches in each corner, and in the last corner of every round, instead of those 2 chain stitches, I made 1 chain stitch and 1 single crochet.
- In the video, however, I made the granny square slightly differently when it comes to the corners — using 1 chain stitch in the corners and, at the end of the round, 1 single crochet in the last corner.
I suggest ignoring this difference shown in the video and making the granny squares as described in the written instructions and chart above. Everything else in the video tutorial is valid and helpful for the project.
Assembling Diagram
In the Diagram below you can see the order of joining the motifs as well as the number of granny squares for my version of the Eleni dress.
I suggest following my order of joining the motifs given in numbers so that you can check whether the dress suits you while making it. Additionally, you will manage the assembly of the dress more easily.
- Note that motifs 1 and 3 are parts which go over the breasts. For this area I made 2 bra pads to prevent transparency. I simply crocheted 2 white granny square motifs and sewed them onto the squares 1 and 3 on their wrong side.
- Motifs 2, 7, 8, 12, 17, 18, 23, 24, 25, 30, 31, 35, 36, 37 are the front of the dress.
- Motifs 4, 5, 11, 13, 29, 32, 34, 38 are on the sides.
- Motifs 6, 10, 15, 21, 16, 22, 28 on the left, and 9, 14, 20, 27, 19, 26, 33 on the right, form the back of the dress.

Joining at the back
As you are making the dress, make sure you join the motifs correctly. Here are the motifs you need to join (and leave unjoined) at the back so that you have the right shape of this dress:
- Motifs 4 and 5 will remain unjoined between themselves. This is where the back forms a nice V-shape.
- You need to join motif 6 with motif 9, motif 10 with motif 14, motif 15 with motif 20, and motif 21 with motif 27.
If you join the motifs in the right way, the back of the dress will have the square motifs positioned in a vertical line, while at the front the granny square motifs will flow diagonally.
The Original Piece
If you want to make the dress longer, like the original garment, simply add more motifs to it – the blank squares on the diagram.
Another difference between my dress and the original concerns the back assembly. If you compare the two versions, you’ll notice that originally motifs 4 and 5 remain unjoined with motifs 9 and 6. In my version I decided to join 4 and 5 to the corresponding 6 and 9 for a more secure fit. See photos below.
This difference led to a little distinction in the way the drawstring flows across the back, and an overall shape of the back cleavage. I find both options beautiful and amusing, so it’s up to you which one you want to choose.


Finishing Touch
As the final stage, I did one round of dc stitches around the neckline to make the edge look more finished. I made the drawstring by crocheting a very long chain and did one row of sc along it.
I’d like to add that it took me about 25-30 minutes to make one square, which means that the entire dress took up about 20 hours to complete.
Ready for the challenge?
If you like making things that require a bit more patience and attention, but reward you with something truly special in the end, the Eleni Granny Square dress could be the very challenge you’ve been looking for. Square by square, the fabric grows and transforms simple yarn into a striking garment.


